Description
Overview
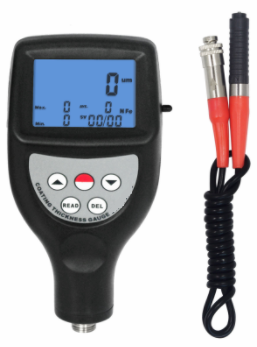
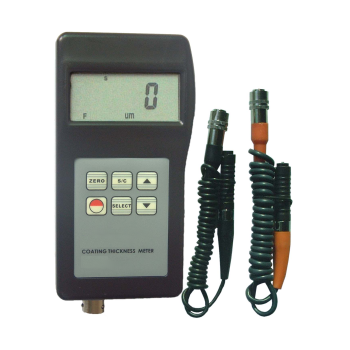
GAOTek Coating thickness Gauge with High Accuracy (Data Memory) can store data in 99 groups and is designed to measure the thickness of non-magnetic materials with minimum measuring thickness of 0.01 in (0.3 mm). The thickness of non- magnetic materials can be measured using F-probe and non-coating on non-magnetic materials using N- probe with single and continuous measurement mode. It has provision to retrieve the data via Bluetooth. Measuring is more flexible with several types of probes. It has selectable metric and imperial system for measurement. This gauge can be used both in the laboratory and in harsh field conditions. It complies with ISO 2178, ISO 2361, DIN, ASTM and BS standards.
Key Features
- The F probes measure the thickness of non-magnetic materials (e.g. Paint, Porcelain enamel, plastic, copper, zinc, aluminium, chrome etc) ad magnetic material (e.g. Iron, nickel etc).
- Measure the thickness of galvanizing layer, lacquer layer, porcelain enamel layer, phosphide layer, copper tile, aluminium tile, some alloy tile, paper etc.
- The N probes measure the thickness of non-magnetic coatings on non-metals (e.g. anodizing, varnish, paint, enamel, plastic coatings, aluminium, brass, non-magnetic stainless steel etc.)
- Can store the new data in 99 groups
- Two measuring methods: magnetic induction(F) and eddy current(N)
- Two measurement mode: Single and Continuous
- Wide measuring range and high resolution.
- Selectable metric/imperial conversion system.
- Manual or automatic shut down.
- Automatic memory of calibration value and automatic recognize the substrate.
- Operation process have buzzing reminder, while no buzzing in continuous mode.
- Use USB data output and RS-232 data output to connect with PC.
- Provide Bluetooth data output choice.
- Meets the standards of both ISO 2178 and ISO 2361 as well as DIN, ASTM and BS.
Technical Specifications
| Measuring Range | 0 ~ 1250 µm/0 ~ 50 mil |
| Resolution | 0.1 µm/1 µm |
| Accuracy | ±1 ~ 3 % or 2.5 µm |
| Minimum Radius Workpiece | F Type: convex 0.06 in (1.5 mm) /
concave 0.98 in (25 mm) NF Type: convex 0.12 in (3 mm) / concave 1.97 in (50 mm) |
| Minimum Measuring Area | 0.24 in (6 mm) |
| Minimum Sample Thickness | 0.01 in (0.3 mm) |
| Data Memory | 99 Groups |
| Display | 4 digits LCD backlit |
| PC Interface | RS -232 interface |
| Power Supply | 2 X 1.5 AAA (UM-4) Battery |
| Size | 5.0 in x 2.6 in x 1.6 in (126 mm x 65 mm x 35 mm) |
| Weight | 2. 85 oz. (81 g)
(not including batteries) |
| Operating Humidity | < 95% |
| Operating Temperature | 32 ˚F ~ 122 ˚F (0 ˚C ~ 50 ˚C) |
| Standard Accessories | ( 2 in 1 ) Fe and NFe probe – 1 pc
Calibration foils – 1set Substrate (Iron) – 1 pc Substrate ( Aluminium) – 1 pc User Manual – 1 pc |
| Optional Accessories | RS -232C cable and software
USB adaptor for RS-232C Carrying case |
FRONT PANEL DESCRIPTION:

- Probes Inbuilt
- Display
- Power/Zero Key
- plus Key
- minus Key
- Reading Key
- Deleting Key
- Jack for RS 232C
- Battery Cover
- Wrist Ring
Display Description

- Low Battery Indicator
- Measuring Symbol
- Last Reading/Browsing Value
- Max. Indicator Value
- Min. Indicator Value
- Browsing State
- Measuring State
- Unit
- Average Indicator
- Substrate Indicator
- Counter for Storing
- Counter for statistics
Measuring Procedure
- Press the power key to switch on the power and “0” shows on the Display. The gauge will restore the last operation on display itself with “Fe” and “NFe” symbol showed on display. The gauge enters the auto mode which can automatically recognize the substrate itself.
- Press the probe on a coating layer to be measured. The reading on the display is the thickness of the coating layer. The reading can be corrected by pressing the Plus key and Minus Key while the probe is away from the substrate or the measurement body.
- To take the next measurement just lift the probe to more than 1 centimeter and then repeat the step above. The gauge can memorize the continuous measuring value automatically with statistic measurement times. Meanwhile the max, min and average value will show on display.
- To change the measurement unit “um” or “mil” by pressing Power key and not releasing it till “UNIT” on the display and then pressing Zero key.
- To change measurement mode from the single to continuous or vice versa just pressing the Power key and not releasing it till “SC” on the display and then pressing Zero Key. If the measurement mode is continuous and the symbol ‘((.))’ shows in the display never disappears. If it is in a single measurement mode, the symbol ‘((.))’ only appears for some time while taking measurement.
STASTISTICS
This GAOTek Coating thickness Gauge with High Accuracy (Data Memory) calculates and displays a statistical analysis of readings as they are taken. Following are the values which are available for the reading.
- Last Value
- Mean Value marked by Ave.
- Highest reading marked as “Max”
- Lowest reading marked as “Min”
- Number of readings taken
To erase the data while starting the new measurement, press and release the ZERO key. In measurement mode marked by SV last value could be deleted one time by pressing the “DEL” key and re-statistics is calculated and displayed itself.
STORING AND RECALLING READINGS
- Readings taken are automatically saved to the memory of the gauge. The memorized data can be browsed by pressing and releasing the “RD” key to enter the browsing state and shows “READ” in display.
- In the browsing state all the readings memorized can be recalled on the display by pressing the plus key ‘▲’ or the minus key ‘▼’.
- To delete single memorized value from the memory, locate the reading by pressing ‘▲’ or ‘▼’ now press and release the “DEL”. If there is an “Err0” on the display then it indicates that there is no data to be deleted.
- To exit the measurement state just press “ZERO” Key.
DELETING READINGS
- To delete a reading on the display just press the key “DEL”. It works in both the states measurement state where the display shows by “SV” or in the Browsing state where the display shows “RD”. To go to Browsing state by pressing “READ”. To enter into measurement mode press “ZERO” key
- To delete all the readings from memory press the “DEL” key in measurement state (“SV” status in display) for about 4 seconds till number of readings become zero in memory
TRANSFERRING READINGS TO COMPUTER
- Install RS 232 software in your PC.Note: Please click “Continue” in all the steps whenever required while installing.
- Connect the gauge to PC using optional cable.
- Switch on the gauge and ensure the Reading screen is displayed.
- Open the software and follow the instructions given in DEMO.EXE.
CALIBRATION
- Zero Adjustment : Zero Adjustment for “Fe” and “NFe” should be carried out separately. If “Fe” is displayed in the screen take iron substrate. If “NFe” displayed in the screen take aluminum substrate.Place the probe (3-1) on the substrate steadily. Press “ZERO” key till “0” appears in the display. Do not lift the probe till finished.While pressing ZERO key if the probe is not placed on the substrate or placed on uncoated standard the zero adjustment will be invalid. i.e.) zero adjustment failed.
- Select an appropriate calibration foil according to your measurement range.
- Place the standard foil on selected substrate or uncoated standard
- Place the sensor gently into the standard and lift it. The reading on the display is the measured value. The displayed value can be adjusted by pressing the Plus key or the Minus Key while the probe is away from the substrate or the measured body.
- Repeat step 4 until correct result.
BATTERY REPLACEMENT
- When it is necessary to replace the battery i.e.) battery voltage goes down to approximately 2.2 V and the battery symbol
 will appear on the display.
 - Slide the battery cover and remove used batteries.
- Install the batteries (2 X1.5 V AAA/UM-4) correctly in the case
- If the gauge is not used for longer period remove the batteries.
CONSIDERATIONS
- To avoid the influence of the measured material on the accuracy of the reading it is recommended calibrations should be done on the uncoated material
- Probes are prone to wear and tear. Probe life is depend on the number of measurements taken and how abrasive the coating is. Probes can be replaced only by qualified persons only.
RESTORE FACTORY SETTINGS
When to restore
It is recommended to restore the factory setting in one of the following scenarios
- The gauge does not measure anymore.
- Measurement accuracy is decreased because of changing environment
How to restore
- Factory settings includes “Fe” and “NFe” setting also. Depends on the requirement settings can be restored for both or alone. Please follow the instructions below
- Please note the symbol in display. If it shows “Fe” then the restoration is only for “Fe” settings. If the display shows “NFe” then the restoration is only for “NFe” settings
- Press the Power key till “CAL” shows in the display. It takes about 12 seconds to see “CAL” in the display.
- When F:H or mF:H is on the display lift the probe to 5 centimeters above the gauge then press ZERO key to make the gauge to go to measurement state.
Now the factory settings are restored. Note: Each stage have only 6 seconds to restore the factory settings. If the gauge is not restored within that 6 seconds it quits the restoration process and restoration is cancelled.
Notes:
- All the setting like restoring factory settings, unit setting, S/C setting all should be done within 6 secs. Otherwise the gauge exits the setting procedure and the setting become invalid.
- It is strongly recommended that no changes should be done to the value of Ln. It affects the Changing Ln can be done by pressing and holding the Power key for about 14 secs. Its value can also be changed by pressing Plus or Minus Key.
- Ln value can be adjusted only by experienced professional under the circumstance where the probe need to be replaced or to make the gauge to give more accurate readings
Generally the larger the value of Ln the smaller the reading on same thickness. Small variation in Ln cause great change higher end e.g. at 500 µm/20 mil. The rules to adjust Ln are as follows
- Reading at low end can be adjusted to exact value by pressing plus or minus key.
- To increase the value Ln is low end (e.g. 51 um) is not an issue. The issue is increasing the value of Ln in higher end (e.g. 432 um) because the deviation is high. On the other side decreasing the value of Ln at lower end is fine where as decreasing the value of Ln in Higher end because the deviation is too small
- Repeat the steps A to B till readings and accuracy are satisfying on every standard foil.


