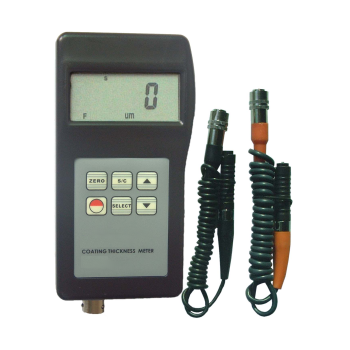
GAOTek Coating Thickness Gauge with Large Range (2 Measurement Mode)
This Coating Thickness Gauge with Large Range (2 Measurement Mode) is designed to measure the thickness of
non-magnetic materials on magnetic materials in the range of 0 in ~ 0.47 in (0 mm ~ 12 mm).
Description
Overview
GAOTek Coating Thickness Gauge with Large Range (2 Measurement Mode) is designed to measure the thickness of non-magnetic materials on magnetic materials in the range of 0 in~0.47 in (0 mm~12 mm). It has 2 measurement modes: single and continuous. Continuous mode is easy to measure the coating thickness of small objects and curved objects. This device works on magnetic induction (F) principle and eddy current (NF) principle. It is easy to carry, small in size and light in weight. Although advanced and complex, this coating thickness gauge is easy to operate and use.
Key Features
- Provide Bluetooth data output choice.
- Use USB/RS-232 data output to connect with PC.
- Manual or automatic shut down
- Metric/imperial system selectable.
- Automatic memory of calibration value and automatic recognition of the substrate.
- Measuring principle: magnetic induction (F Magnetic Induction and NF Type Eddy Current).
- Two measurement modes: Single and Continuous
- Operation process has a buzzing reminder, while no buzzing in continuous mode.
Technical Specifications
| Principle
|
F Magnetic Induction and NF Type Eddy Current |
| Range | 0 in ~ 0.47 in (0 mm~12 mm)/
0 mil ~ 480 mil |
| Accuracy | ±1 ~ 3% or ±0.007 in (±0.2 mm) |
| Resolution | 0.0004 in (0.01 mm)/0.003 in (0.1 mm) |
| Minimum Sample Thickness | 0.011 in (0.3 mm) |
| Metric/Imperial | Convertible |
| Minimum Measuring Area | 0.62 in (16 mm) |
| Minimum Radius Workpiece | convex 0.78 in (20 mm)/
concave 1.96 in (50 mm) |
| Automatic Power Off | Yes |
| Battery Indicator | Low Battery Indicator |
| Power Supply | 4 x 1.5 V AAA (UM-4) Battery |
| Dimension | 4.96 in x 2.55 in x 1.06 in (126 mm x 65 mm x 27 mm) |
| Weight (Not Including Batteries) | 0.46 lbs (210 g) |
| Operating Humidity | < 80 % RH |
| Operating Temperature | 32 ˚F~122 ˚F (0 ˚C ~50 ˚C) |
Additional Information
Principle
| Principles | Applications | Examples |
| F Type Magnetic Induction (Iron Base) | Measure the thickness of non-magnetic materials on magnetic materials | Galvanizing layer, lacquer layer, porcelain enamel layer, phosphide layer, copper tile, aluminum tile, some alloy tile, paper etc. |
Front Panel Descriptions
Gauge with external probe(s)
3-1 Probes
3-2 Display
3-3 Zero key
3-4 Plus key
3-5 minus key
3-6 Power key (multi-functional)
3-7 Select key for µm/mil conversion
3-8 Battery compartment/cover
3-9 calibration high key
3-10 Jack for RS232C interface
Measuring Procedure
- Plug in the F-probe for the external type.
- Press the power key (3-6) to switch on the gauge and ‘0’ displays on the Display (3- 2). The gauge will restore the state of last operation itself, with a symbol ‘Fe’ indicating on the Display.
- Place the probe (3-1) onto a coating layer to be measured. The reading on the Display is the thickness of the coating layer. The reading can be corrected by pressing the plus key (3-4) or minus key (3-5) while the probe is away from the substrate or the measured body.
- To take the next measurement, just lift the probe (3-1) to more than 5 centimeters and then repeat the above
- If suspecting the accuracy of measurement, you should calibrate the gauge before taking the measurements.
- The gauge can be switched off by pressing the Power key (3-6) at any time. On the other side, the gauge will power itself off about 50 seconds after the last operation.
- Change the measurement unit ‘um’ or ‘mil’ by depressing the shortcut key (3-7) or depressing Power key and not releasing it till ‘UNIT’ on the Display and then pressing Zero key (3-3). It is about 7 seconds from starting depressing Power key.
- To change measurement mode from the single to continuous or vice versa, just depress the Power key and not release it till ‘SC’ on the Display and then press Zero key (3-3). The symbol ‘
’ represents continuous mode and ‘S’ represents single mode. It is about 9 seconds from starting depressing Power key.
Calibration
- Zero adjustment: Place the probe (3-1) on the iron substrate or anuncoated standard steadily. Press the zero key (3-3) and ‘0’ will be on the Display before lifting the probe. If you press the ZERO key but the probe is not placed on the substrate or an uncoated standard, the zero calibration is invalid.
- Select an appropriate calibration foil according to your measurement range.
- Place the standard foil selected onto the substrate or the uncoated standard.
- Place the sensor (3-1) mildly onto the standard foil and lift. The reading on the display is the value measured. The displayed reading can be corrected by pressing the plus key (3-4) or minus key (3-5) while the probe is away from the substrate or the measured body.
- Repeat the above step until the result is correct.
- For the large range of coating gauge, it is very important to carry out high-end calibration often.
Battery Replacement
- When it is necessary to replace the battery, the battery symbol
will appear on the Display.
- Slide the Battery Cover (3-8) away from the instrument and remove the batteries.
- Install the batteries (4×1.5 V AAA/UM-4) correctly into the case.
- If the instrument is not to be used for longer period, remove batteries.
Considerations
- In order to weaken the influence of the measured material on the accuracy of measurement, it is recommended that the calibrations should be done onthe uncoated material to be measured.
- Probes will eventually wear. Probe life will depend on the number of measurements taken and how abrasive the coating is. Replacement of a probe can be fitted by qualified persons only.
Restore Factory Settings
- It is recommended to restore factory settings in one of following cases.
a.The gauge does not measure anymore.
b.Measuring accuracy is degraded which is caused by the abraded probe or by environmental conditions changes.
c.Replacement of a new probe.
2.You can restore the factory settings easily. Please follow procedures below to restore the factory settings.
- Depress CAL-H key,when F: H is on the Display, lift the probe to more than 25 centimeters.
- Then press the Zero key and the gauge return to measurement state. The factory setting is restored.
- Remember, to restore factory setting should be done within 6 seconds or the gauge will quit itself and restoration is invalid.


