Description
Overview
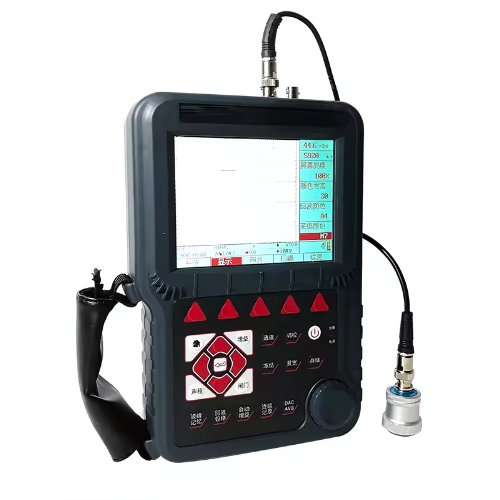
GAOTek digital flaw detector based on ultrasonic principle, digital ultrasonic flaw detector UT600 with 320 x 240 TFT 240 TFT LCD, can test, orient, evaluate, and diagnose various flaws such as card, air hole in workpieces interior swiftly and accurately without any destruction. It can be used in laboratories as well as in the engineering field. With a range of 0 mm to 9999 mm, it can meet the requirement for general defect inspection in the manufacturing industry, metallurgical industry, metal processing industry, chemical industry, and so on.
Features
- Gate position, gate width, and gate height can be adjustable at will. The B gate can choose to set a wave-getting alarm or a wave-losing alarm. The beep in the gate and LED light can be alarmed or closed (the LED light alarm is very effective in a noise environment).
- The instrument is built with mass storage. The data and files will not be lost because of instrument power breakdown. The storage contents included channel parameters, waveform pictures, and video files. It supports 100 groups of flaws detecting parameters channels. It can preset well for the combination parameters of various types of probes and instruments as well as set testing standards for each industry freely. It can save 10000 pictures of detecting echo signals and parameters. It can save, read, and transfer data via the USB port.
- The instrument supports saving the inspection process as a video file and saving it to the internal storage card. Video files can be replayed through the instrument. The instrument can support 2-minute video.
- Record and save the tracking record of detecting date and time in real time
- With a USB2.0 high-speed communication interface, it also can use special software to upload and download data through the USB port.
- The large-capacity lithium battery module is easy to assemble and disassemble. It can be charged independently but also charged by inserting wire. Its continuous working time is more than 8 hours
- Flaw Detecting Standard: Built-in the commonly used flaw detecting standards for each industry. It can be directly called for using convenient and fast.
- Welding Figure: It can set the welding parameters, show the welding figure and defects as well as echo path directly during testing.
- Automatic Calibration: Automatic calibration for P-Delay and probe angle (K value), automatic measuring function for sound velocity.
- Peak Memory: real-time search for the defect with the highest wave and record the defect peak echo.
- Defect Positioning: real-time display of the defect level, depth (vertical), and sound path position.
- Defects quantify real-time display of the defect equivalent dB value
- Defect quality: With echo envelope waveform, it is convenient for judging according to artificial experience.
- Curved Surface Correction: Used for flaw detection for the curved surface workpiece, it can display the defect circumferential position and depth in real-time.
- Digital-analogy dual-use: without needing to do AVG curve, using the bottom wave gain method to measure dB value to achieve the dual-use for digital-analogy, it is easy to operate.
- Value Calculation: It can auto-calculate and display the defect’s equivalent size after finding the peak echo of the defect when the straight probe detects the forgings.
- DAC or AVG: Automatic produced curves without limitation for sampling point, it can do offset and correction for the curves. The curves float automatically with the gain and expand automatically with the sound path as well as move automatically with time delay. It can show any aperture AVG curve.
- Gain: 0 dB to 110 dB adjustable in selectable steps 0.1 dB, 1 dB, 2 dB, and 6 dB. Unique automatic gain adjustment and scanning gain functions make flaw detection fast and accurate.
- AWS D1.1 or 1.5: The American Welding Society standard provides a dynamic reflector “defect level” for all types of AWS weld inspection applications. It can avoid manual calculation and improve detection efficiency.
- Crack Depth: with endpoint diffraction wave, it can measure and calculate the crack depth automatically.
- Envelope in Gate: Amplify the echo details, easy for echo analysis
- Continuous Record: real-time record the waveform, save, and playback it.
- Waveform freeze: freeze the waveform shown on the screen for convenient analysis of the defect.
- Echo Code: Display 1 to 6 times the echo display area in different colors, distinguish the first and second wave better, easy to determine the defect position.
- Common B Scan: real-time scanning, cross-section display, make the detecting result more visually.
Technical Specifications
| Display | 320 x 240 TFT LCD |
| Measuring Range | 0 in to 393.70 in (0 mm to 999.9 cm) in steel |
| Bandwidth | 0.5 MHz to 15 MHz |
| Material Velocity | 1000 m per s to 9999 m per s |
| Dynamic Range | >= 36 dB |
| Vertical Linear Error | <= 3.0 % |
| Horizontal Linear Error | <= 0.2 % |
| Resolution | > 40 dB (5P14) |
| Sensitivity Leavings | > 60 dB (flat-bottomed deep hole 20 cm) |
| Rejection | (0 to 80) % Linear without affecting the linearity and gain. |
| Noise Level | <= 10 % |
| Power Supply | DC 9 V |
| Working Time | Less than 8 hours |
| Relative Humidity | 20 % RH to 95 % RH |
| Operating Temperature | 14 °F to 122 °F (-10 ℃ to 50 ℃) |
| Overall Dimensions | 10.3 in x 6.7 in x 2.4 in. (26.3 cm × 17 cm × 6.1 cm) |


