Description
Overview
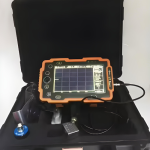
GAOTek high-speed precise ultrasonic flaw detection with automatic calibration is a portable industrial non-destructive flaw detector, which can rapidly, easily and accurately inspect, locate, evaluate and diagnose various defects (crack, inclusion and pinhole, etc.) in a workpiece without destruction. It can be used both in a lab and field. The instrument can be widely used in any fields that need defect inspection and quality controlling e.g. manufacturing industry, iron & steel metallurgical industry, metalworking, chemical industry, etc., also be broadly used in the active safety inspection and service-life evaluation in such fields as aerospace, railway transportation and boiler pressure vessels, etc. It is an essential instrument for non-destructive inspection industry. When the ultrasonic wave propagates in a job, one can detect the defect in it by the influence on the propagation of ultrasonic wave based on the acoustic characteristic demonstrated by the defect in the material. Based on this principle, by using ultrasonic waves one can measure such defects as cracks, pinholes and inclusion in such media as metal, non-metal and composite.
Features
- The dual CPUs work in coordination, high speed detecting and data processing
- Automatic calibration
- Easy tests of thickness and sound velocity of materials
- Freely set standards for various industries to meet different flaw detection
- Automated display precise flaw location (Depth d, level p, distance s, amplitude, dB, diameter φ)
- Freely set standards for various industries to meet different flaw detection
- The echo suppression is adjustable from 0 % to 90 %, without affecting the dB gain and linearity
- DAG and AVG (DGS) curves are generated automatically
- Multi-functions for easy detection: peak memory, Display freeze, automatic gain & wave search
- Li-battery, continue working time up to 10 hours
- Storage: 500 sets of flaw detection process and data storage
- Provides high contrast viewing of the waveform from bright, direct sunlight to complete darkness and easy to read from all angles
- USB connects to computer, automatically generate flaw detection report
Technical Specifications
| Sound Velocity | 3280.84 ft/s to 32798.72 ft/s (1000 m/s to 9999 m/s) |
| Working Methods | Pulse echo, dual, and thru transmission |
| Sensitivity Leavings | ≥ 50 dB |
| Power | AC Mains 100 V AC to 240 V AC, 50 Hz to 60 Hz |
| Included Tools | DAC, AVG, AWS, etc. |
| Dynamic Range | ≥ 36 dB |
| Linearity (Horizontal Error) | Not more than 0.1 % in the scanning range |
| Detection Range | 0 cm to 100 cm, at steel velocity |
| Range of scanning | Range of scanning: 0 in to 39.37 in (0 cm to 100 cm) |
| D-delay | D-delay: 0 ft to 5626.65 ft (0 ms to 5000 ms) |
| MTLVEL | 3280.84 ft/s to 32798.72ft/s (1000 m/s to 9999 m/s) |
| Working mode | Single probe (receiving and sending), double probe (one for receiving and another for sending), transmission (transmission probe) |
| Frequency Range | 0.5 MHz to 10 MHz |
| Gain adjustment | 0 dB to 110 dB |
| Reject | 0 % to 80 % of screen height |
| Vertical linear error | Vertical linear error is not more than 3 % |
| Alarm | Three modes, i.e. forbidden wave, loss wave and auto |
| A-Scan display area | Full screen or local
A-Scan display freezing and de-freezing A-Scan filling |
| Data save | 500 A-Scan images (including setting of instrument) |
| Standard communication interface with PC | USB |
| Battery | Li battery 3.6 V 3000 mAh x 4 |
| Power adaptor | 4.2 V DC 220 V AC |
| Working humidity | 20 % RH to 90 % RH |
| Working temperature | −4 ℉ to 122 ℉ (-20 ℃ to 50 ℃) |
| Size | 6.38 in x 4.13 in x 1.65 in (16.2 cm x 10.5 cm x 4.2 cm) |
| Net Weight | 23.99 oz (680 g) (including Li-ion battery) |


