Description
Key Features
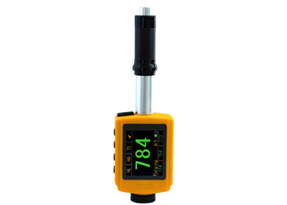
- Pen type design, self contained (Impact device and display integrated); no cables
- Hardness scale includes HRC, HRB, HV, HB, HS, HL and, σb.
- Ability to test variety of surfaces including Steel and Cast Steel, Stainless Steel, GC IRON, NC IRON, Cast Aluminium alloy, Mach metal, Copper-tin alloy, Brass and Forged Steel.
- Automatic data calibration.
- Large screen 1.77 inch OLED display.
- Interchangeable D/DL impact device can be used in the restricted area measurement.
- High accuracy in any impact direction; automatically identifies impact direction and gravity compensation.
- Easy Operation, the four soft keys above the screen achieve the various functions.
- Bluetooth wireless printing.
- Storage capacity of 1000 group values, each group includes 6 testing results and 1 average value.
- The dry battery can be replaced by user; instrument life is no longer limited by battery.
- Easy language selection
- Comes with USB port for easy recharging and data transmission.
- Auto shutdown of instrument after 3 minutes of inactivity; warning on low voltage.
- LmVIEW Software for transmission, storage, and printing.
Technical Specifications
| Measuring Range | HLD (200-960), HRC (19.8-68.5), HB (30-651), HV (80-976)
HS (26.4-99.5), HRB (13.5-100), σb (375-2639) |
| Measuring Direction | 360° (Manual setting) |
| Standards | GB/T 17394-1998, ASTM A956 |
| Interface | USB |
| Accuracy | ±6 HLD (HLD=800) |
| Hardness Scale | HL, HB, HRB, HRC, HV, HS, σb |
| Repeatability | <6 HLD (HLD=800) |
| Display Type | 1.77 in OLED with resolution 160 x 128 pixels |
| Resolution | 1 HL, 1 HV, 1 HB, 0.1 HRB, 0.1 HRC, 0.1 HS |
| Calibration | Automatic |
| Memory | 1000 groups ,each group include 6 testing result and 1 average value |
| Software | LmVIEW Software |
| Instrument Shut-off | AUTO OFF after 3 minutes of inactivity |
| Power | 3.7 V AAA Polymer lithium battery,
Capacity :600 mAH |
| Weight | 0.24 lbs (110 g with D type impact device)
0.27 lbs (125 g with DL type impact device) |
| Dimension | 5.90 in × 1.81 in × 0.90 in (150 mm × 46 mm × 23 mm) |
| Temperature | 14 °F ~ 122 °F (-10 °C ~ +50 °C) |
Additional Information
Principle of Leeb Hardness Testing Method
The impact body, which is equipped with hard metals spherical indenter, impacts into the
work piece and rebounds back. Using the electromagnetic principle, the rebound and impact velocities are measured at the 1mm point from the work piece in the following way: the internal permanent magnet of the impact body produces an induced voltage in the coil of impact device and this voltage is proportional to the speed of the impact body. The Leeb hardness values are calculated by the following formula:
HL=1000×(Vb / Va)
In Which:
HL: Leeb hardness values
Vb: the voltage produced during the rebound of impact body
Va: the voltage produced during the impact of impact body
Figure shows the voltage produced during the impact and rebound of impact body:

voltage features of output signal
Summary
Instrument Diagram

Standard delivery
- Main unit (With D type impact device)
- HLD High-Value Standard Calibration Block
- Data View Software
- USB Communication Cable
- Small Supporting Ring
- Cleaning Brush
- Recharger
- Operating manual
- Instrument Case
- Polymer lithium battery, Voltage: 3.7 V, Capacity of 600 MA/H, “Prohibition of air transport”
Optional accessories
- DL Impact device
- Standard calibration test block
- Standard supporting ring
- Special supporting rings
- Small supporting ring
Functions and Applications
Applications
- Installed machinery and permanent assembly parts
- Mould cavity
- Heavy workpieces
- Failure analysis of pressure vessel, turbine and other equipment
- Small test area
- The production line of Bearings and other parts
- Distinguish the material of the metal material warehouse
Pre-Treatment of Workpiece
Workpiece Requirements
- Surface roughness is an important requirement for the test piece, it should be smooth andno oil otherwise will cause measurement errors. The surface roughness of the sample at alltesting points must be less than 2 μm.
- Sample weight >02 lbs (5 kg), it does not easily move, can be tested directly without support.Sample weight is 4.40 lbs ~ 11.02 lbs (2~5 kg), with overhanging part or thin wall workpiece, the sample should befixed in place with object more than 11.02 lbs (5 kg) weight to avoid deformation or moving.
- Sample weight <40 lbs (2 kg),the sample should be coupled with another supporting object, theweight of supporting object should be more than 11.02 lbs (5 kg), and the surface of supporting bodyshould be flat, smooth, and no excess coupling agent, the rule is that the testing directionmust be perpendicular to the coupling surface throughout the test procedure.
- Other requirements of the sample: Sample weight ≥ 0.22 lbs (0.1 kg), Sample thickness ≥ 0.196 lbs (5 mm) hardened-layer depth of the sample >0314 (0.8 mm).
- While the supporting body being clamped, the impact direction should be perpendicular tothe testing surface.
- When sample is large area of plate, long rod, or curve piece, even fairly heavy and thick, itmay also cause incorrect test value. So the back of the test position should be reinforced andsupported.
- The magnetism of the sample should be less than 30 gauss.
Selection of Supporting Ring
When the curvature radius(R) of testing sample surface is smaller than 1.18 in (30 mm) and greater than 0.43 in (11 mm), the small supporting ring should be used, or choose our special supporting ring(Optional) to obtain the best test condition.
Operation
Turn on the Instrument
Press power on button (D) to turn on the instrument, the screen display the default interface,thenpower on again to display the last parameters automatically.
Parameters Setting
Material Setting
Press material setting button (B) to choose the material, code no. from M0~M9:
| Material Code No. | Hardness | Tensile Strength |
| M0 | Steel/Cast Steel | Carbon Steel |
| M1 | Gray Cast IRON | Cr-Ni Steel |
| M2 | Nodular Cast IRON | Cr-Mo Steel |
| M3 | Cast Aluminium Alloy | Cr-V Steel |
| M4 | Brass | Cr-Mn-Si Steel |
| M5 | Bronze | High-Strength Steel |
| M6 | Copper | Stainless Steel |
| M7 | Stainless Steel | Cr-Ni-Mo Steel |
| M8 | Forging Steel | Chrome Steel |
| M9 | Alloy Tool Steel | Low-Strength Steel |
Hardness Scale Setting
Press scale setting button (A) to choose the Hardness scale and strength;

Note: when choosing DL probe in the storage interface, “HLD” displays as “HLDL”.
Impact Times Setting
Press times button (C) to set the impact times from T1~T6, which will calculate the AVE value after certain impacts.
Impact Direction Setting
Press direction button (D) to select impact direction, 360 degree.

Measuring
Start measuring after finish the parameters setting:
- Load the impact body: Pushing the loading-tube until contact is felt. Then allow it to slowly return to the starting position locking the impact body.
- Press the impact device support ring firmly on the surface of the sample, the impactdirection should be perpendicular to the testing surface.
- Press the release button on the upside of the impact device to test. The sample and theimpact device as well as the operator are all required to be stable now.
- Aftertesting, the screen displays as following, the tester will save testing resultsautomatically, or it won’t save testing results if the testing value is invalid. After severaltesting, the recent testing values will display in sequence at the bottom of the screen.
Interface Description

This instrument has total four main interfaces and one sub-interface (under the storage interface), long press the four buttons to switch to the corresponding four interface: defaultinterface, calibration interface, storage interface, setting interface.
- The A button corresponding to the default interface(booting interface): including scale(A),
- Material(B), impact times(C) and impact direction(D).
- The B button corresponding to the calibration interface: including calibration(A), remove thecalibration coefficient(B), increase(C) and decrease(D) calibration value(To operate whenmean value appears).
- The C button corresponding to the storage interface: including save(A)(effective under themean value), read(B), delete the current value(D), the saved hardness values can be readand deleted when enter into read interface.
- Click B button to switch the sub-interface to read the stored values.
- The D button corresponding to the setting interface: Language, impact device, turn on/off the bluetooth and power off can be set under this interface.
Default Interface
A→Hardness scale switch button.
B→Material switch button.
C→Impact times selection button, calculating the mean value according to the selected times.
D→Impact direction selection button.

Calibration Interface
Measuring error can be usually caused by impact device abrasion after long time using. So it is necessary to correct the error by calibration procedure to make the measurement accurate.
A→Calibration button, can be operated only if the mean value effective.
B→Remove the calibration coefficient button, long press to delete the calibration coefficient.
C→Increase button, can be operated only if the mean value effective.
D→Decrease button, can be operated only if the mean value effective.
Note: The function of switch D/DL impact device is in the setting interface. Calibration is needed after replacing to DL impact device.

Storage Interface
A→ Save button can be operated once after the mean value effective.
B→ Read the storage button, press it to enter (the sub-interface).
C→Delete, only the current value can be deleted.
D→Bluetooth
The testing results can be saved automatically, including 6 testing results and 1 mean valueeach group.
Press read button (B) to enter the reading mode, which displayed in cyan color

Sub-interface of Read the Storage
A→Return to storage interface
B→Delete the currently displayed stored value
C→Browse the stored value upwardly
D→Browse the stored value downwardly
Main displays the mean value, and sub displays three stored values.

Figure 5.8
Setting and Shutdown Interface
A→Language switch button
B→Impact device switch button, only DL is optional.
C→Brightness control button, total three levels.
D→Power off button

Data Transmission
The data in stored can be transferred from the instrument to a PC via communication software, for saving, statistic and analysing the measurement.
Maintenance & servicing
After long time using, please use the cleaning brush to clean the tube and impact body.
- Unscrew the support ring first, then take out the impact body;
- Spiral the nylon brush in counter-clock direction into the bottom of the tube and takeit out for several times
- Install the impact body and support ring.
- Release the impact body after use.


