Description
Overview
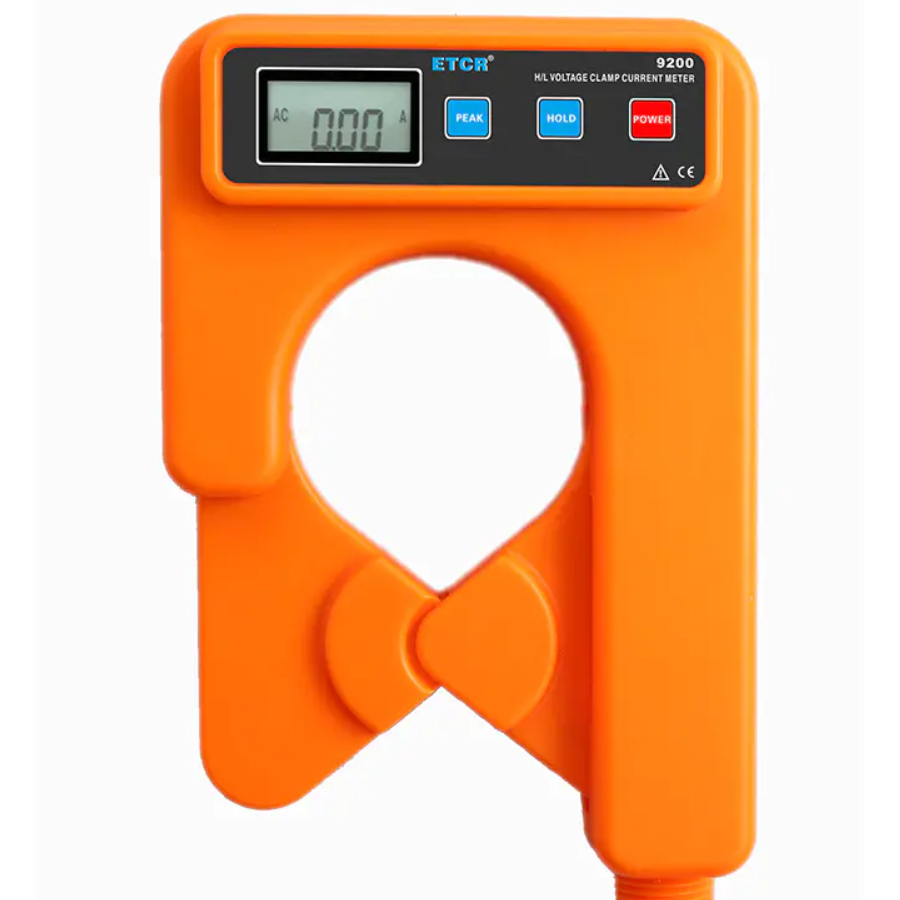
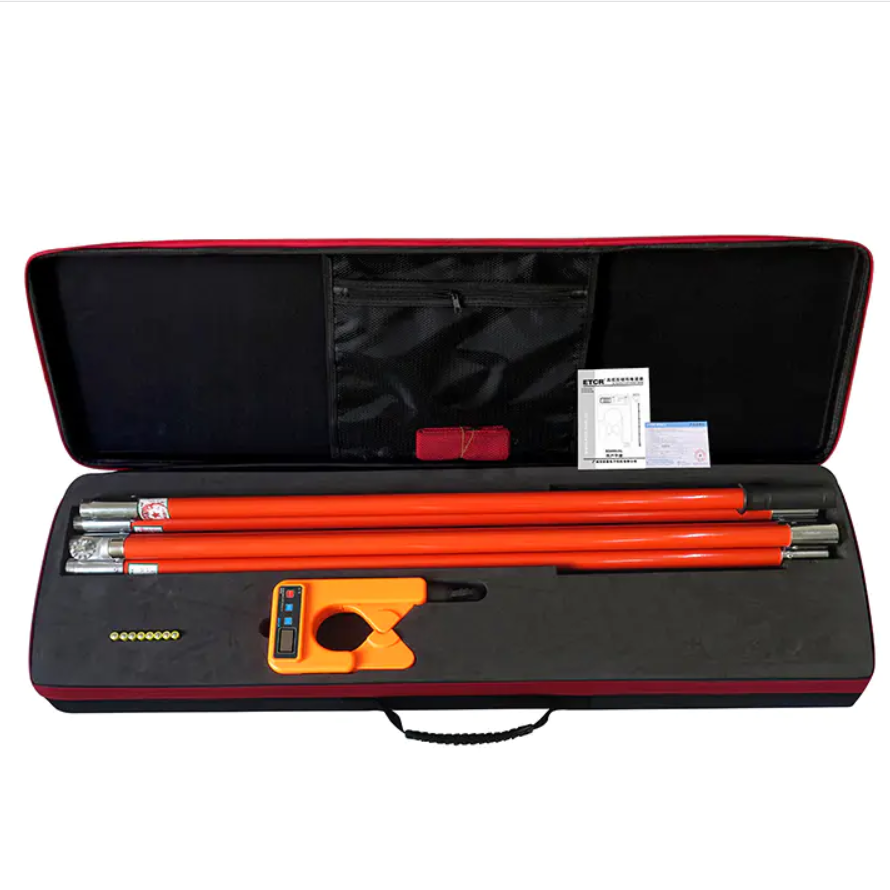
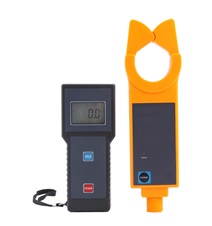
The GAOTek H/L Voltage Clamp Current Meter with Data Storage is apt for measuring high voltage currents by adopting the latest CT and integrated mask digital technology. It is composed of a special clamp current meter and high voltage insulation rods. Without insulation rods, it can used as high-precision, low-voltage clamp meter and leakage current meter, which accurately measures the current or leakage current of 0.01 mA. This device adopts a hook type structure, which can hook the line to test, thereby reducing labor by the user and ensuring high precision, stability, and reliability of the perennial uninterrupted measurement.
When connected with an insulation rod, this device provides features such as the measurement of high voltage currents of cables under 60 KV (with insulation), bare wire cable measurement(≤35 kV), on-line current measurement, peak maintenance, data preservation, data storage, and wireless transmission.
Key Features
- Current clamp apply the latest CT technology and Magnetic Shielding technology, almost free of the influence of external magnetic field, ensuring continuous monitoring of year-round high accuracy.
- Peak hold, data hold and data memory function.
- Data Storage function: 99 Groups, during storage, the symbol “MEM” gives indication, “FULL” mark will flash to indicate the memory has been full.
- Peak Maintenance function: Automatically maintains the height of the test value, usually in the test mode.
- The special clamp ammeter facilitates clamp to exit the tested lead by pressing or pulling back insulation bar, which is time efficient and convenient.
- Adopts hook type structure, which can hook the line to test, save the physical power of user.
Technical Specifications
| Function | High voltage AC current measurement, low voltage AC current, leakage current measurement, on-line AC current supervision. |
| Power Supply | DC6 V Alkaline Dry Battery (1.5 V AAA X 4) |
| Test Method | Clamp CT, Integral Method |
| *Transmission Method | Wireless Transmission, the maximum distance for direct transmission is about 30m. |
| Transmission Distance | 30 m |
| Clamp size | φ68 mm |
| Range of measurement | 0.0 mA~1000 A (50 Hz/60 Hz auto identification) |
| Resolution | 0.01 mA |
| Shift | 0.0 mA~1000 A Automatic Shift |
| Test Accuracy(23 ℃ ± 5℃,Below 80%RH)
|
0.0 mA~299 mA: ±1 % ±3 dgt |
| 300 mA~49.9 A: ±1.5 % ±5dgt | |
| 50.0 A~199.9 A: ±2.0 % ±5 dgt | |
| 200 A~600 A: ±3 % ±5 dgt | |
| 601 A~1000 A: ±4 % ±5 dgt | |
| Sampling Speed | About 2 times/second |
| Display Mode | 4 digital LCD display |
| LCD Dimension | Tester LCD: 1.37 in × 0.84 in (35 mm × 21.5 mm)
Receiver LCD:1.85 in × 1.12 in (47 mm × 28.5 mm) |
| Meter Dimension | Tester: 8.58 in × 5.31 in × 2.36 in (218 mm × 135 mm × 60 mm)
Receiver: 6.69 in × 2.95 in × 1.18 in (170 mm × 75 mm × 30 mm) |
| Data Storage | 99 Groups, during storage, the symbol “MEM” gives indication, “FULL” mark will flash to indicate the memory has been full. |
| Peak Maintenance | Automatically maintain the height of the test value, usually in the test mode press PEAK key, LCD top right corner will display “PE, that is, to keep open the PEAK function, then press PEAK key to cancel this function |
| Circuit Voltage | Test insulating sheath wires(≤60 kV )or bare wire t(≤35 kV )(operated with insulation rod) |
| Data Preservation | Under general test mode, press HOLD button to preserve data, “DH” symbol display. then press HOLD Key to cancel (“HOLD” symbol display) |
| Data Access | “MR” symbol indicates, it can read the stored data by turning upwards and downwards. |
| Overflow Display | Exceed measurement range overflow function: “OL A” symbol display |
| * No signal Indication | When the receiver has not received transmit signal, it will display “no- -”symbol |
| Auto Shut Down | About 15 minutes after booting, the meter will shut down automatically, in order to decrease the battery consumption. |
| Battery Voltage | When the battery voltage is below 4.8 V, the symbol of battery voltage will show to remind to replace battery. |
| Weight | Tester: About 1.36 lbs (620 g Including battery)
Receiver: About 0.48 lbs (220 g Including battery) Total quality of meter: about 5.07 lbs (2.3 kgs including insulation rod and battery) |
| Work Temperature and Humidity | 14 °F ~ 104 °F (-10 °C ~ 40 °C); ≤80 % RH |
| Storage Temperature and Humidity | 14 °F ~ 140 °F (-10 °C ~ 60 °C); ≤70 % RH |
| Interference | Avoid same frequency interfere (315 MHz & 433 MHz) |
| Insulated Rod Dimension | φ32 mm, 1 m/ Section (5 Sections) |
| Insulation Intension | Tester/receiver: AC 2 kV/rms (Between core and shell)
Insulating rod: AC 100 kV/rms (5 sections insulating rod all connections, between both ends) |
1.Structure
- Insulating rod connecting head
- Clamp (boot sector)
- LCD display
- PEAK key (start LCD display “PE”)
- HOLD key
- POWER key
- POWER light
- Insulating rod (5 sections)

2. LCD Display
2.1. Explanation for Special Symbols
- L, the Low battery symbol, when the voltage of battery is lower than 4.8 V, this symbol display, please replace battery in time.
- “OL A” This symbol indicates that the current on test has exceeded the maximum measurement limit of the meter.
- “MEM” Memory mode, it will display during the data storage process.
- “Full” symbol, when the storage memory has been filled with 99 groups of data, it will display “FULL” symbol by flash, which means it cannot continue to store data.
- “MR” data access symbol, which is displayed during looking up data, meanwhile, it will display the serial number of data in storage.
- “End” exit symbol, it will display during the exit.
- “dEL” data delete symbol, it will display when deleting data.
- “no- –” None received signal instructions, dynamic display, it may not in test mode, or adjust the location and distance from receiver.
- “PE” symbol, press “PEAK” display, Indicates start PEAK
- “HOLD”, “DH” symbol, press “HOLD” display, lock the data.
3.Display Demonstration
⑴. ——The current on test is 0.002 A (2 mA) 
⑵. ——Locked display Data
——The data is automatically stored as group 3 
——The current on test is: 160.5 A
⑶.——The current on test is: 571 A 
——Low battery symbol, please replace.
⑷.——Look up data of group 3 in storage 
——The current on test is: 160.5 A
⑸.—— “FULL” flash display:
Storage is full of 99 groups 
——It can’t store more unless delete storage
⑹.——“dEL” Indication of data delete 
⑺.—— “End” Indication of exit 
*⑻.——“no- –”Dynamic display: none received signal 
3.Operation
A. Tester Operation
3.1. Power On/Off
Press POWER button to power on, the instrument will displays the LCD screen, entering normal testing mode. If LCD display is relatively dark after power on, it is possible that battery voltage is a bit lower. Please replace battery. 15 minutes after powering on the meter, if it remains idle, an auto-power off procedure starts to preserve the battery life and LCD will continue flash until the complete switch off takes place after 30 seconds. In case of LCD continuous flash, press POWER button, then the meter will continue to work.
Under HOLD mode, press POWER button for power off.
Under general test mode, press POWER button to power off.
Under PEAK testing mode, press POWER button to power off. Under data reference mode, firstly press POWER button for more than 3 seconds to exit from data reference mode, returning to normal test mode, then press POWER button to power off. During the exit from data access, it will display “End” symbol.
3.2. General Test
General Test: In the process of test, LCD will display the tested current value real time, and LCD data will vary with the current change. When the tester is removed away from the lead on test, it does not preserve the test result, LCD display will return to zero.
In normal testing mode, it is suitable for close distance measurement, convenient for circuit test by direct read of LCD data.
After normal boot, place the lead in the middle of clamp transducer domain, the drop-down instrument clamped conductor to be tested, showing the result on LCD display. If showing “OL A“, it means the lead current on test has exceeded the maximum volume on the level. Please select a higher gear level or a meter with greater measurement limit. Push the instrument can be evacuated before conductor to be tested

Under HOLD mode, press HOLD button to cancel HOLD function, and return to normal testing mode.
Under data reference mode, press POWER button for more than 3 seconds to exit from data reference mode, returning to normal testing mode.
Under PEAK testing mode, press POWER button to exit from PEAK testing mode, returning to normal testing mode.
After data deletion, it will return to normal testing mode automatically.
3.3. PEAK Test
PEAK test: the maximum current test, the meter will make automatic comparison on the changes in measured current, indicating the maximum value and maintain it, when the meter is removed away from the lead on test, the test result will be kept consistently, suitable for the circuit test on those LCD data hard to be read directly. Under the normal testing mode, press PEAK button, LCD display “PE”, enter PEAK testing mode. That means the meter will display and automatically keep the maximum value in the test. Under any other mode, it must be returned to normal testing mode, and then make PEAK testing according to the above operation.
Press POWER button to exit from PEAK testing mode, returning to normal testing mode.
3.4. Data Maintenance
Under normal testing mode, press HOLD button to keep LCD display. Press HOLD button again to release data lock, returning to normal testing mode.
3.5. Data Memory
Under normal testing mode, press HOLD to storage data, at the same time, Meter will automatically form serial numbers, and memory the current preserved data. This meter can memory 99 groups of data, in case of full storage, “FULL” symbol will display by flash continuously, and it cannot continue to memory until cleaning out the previous memory.
3.6. Data Reference
Under normal testing mode, press PEAK + POWER button to enter data reference mode, meanwhile, it will automatically display data saved in the group 01. Then press PEAK or POWER button to read the stored data by turning upwards or downwards in cycle. It will return to the group 1’s data automatically after reaching the last group’s data in storage.
Press HOLD button to exit from data reference mode, returning to normal testing mode. During the exit, it will display “End” symbol.
3.7. Data Deletion
Under data reference mode, press PEAK + POWER button to delete all the data in storage, and return to normal testing mode. During the deletion of data, it will display “dEL” symbol.
3.8. Data Transmission
It has the function of wireless data transmission. When the Meter under testing mode, the test result will be transferred to receiver by wireless transmission and the receiver will display test result real time, being clear at a glance.
Only under testing mode, the meter will transmit, If the receiver has not received emission signals, it will display “no – -” symbol dynamically.
Wireless transmission test data, a straight-line distance of about 30 meters, can penetrate the floor to receive data.
B .Operation of Receiver
- Power On/Off
Press POWER button to power on, the instrument will displays the LCD screen, entering normal testing mode. If LCD display is relatively dark after power on, it is possible that battery voltage is a bit lower. Please replace battery. 15 minutes after powering on the meter, if it remains idle, an auto-power off procedure starts to preserve the battery life and LCD will continue flash until the complete switch off takes place after 30 seconds. In case of LCD continuous flash, press POWER button, then the meter will continue to work.
Under HOLD mode, press POWER to power off.
Under data reference, first, press POWER button (for 3 seconds ) to exit data reference mode, then come back to data receive mode, press POWER button once again to power off. During exit from data reference, it will display the symbol of “End”.
2. Data Reception
After normal power on, the receiver will under receiving mode. If there are emission data, the receiver will display the test result real time. If it has not received any signal, the receiver will search signals constantly, and display “no- -”symbol dynamically.
3. Data Maintenance
Under Data Reception mod, press HOLD button, keep LCD display, “HOLD” symbol indication. Press HOLD button once again to relieve data lock, return to data reception mode, “HOLD” symbol display.
4. Data Memory
Under Date Reception mode, press HOLD button to maintain data, meanwhile, the receiver will automatically form serial numbers, and memory the current preserved data. During the storage, “MEM” symbol will display once by flash. The receiver can memory 99 groups of data, in case of full storage, “FULL” symbol will display by flash continuously, and it cannot continue to memory until cleaning out the previous memory.
5. Data Reference
Under Data Reception mode, press HOLD+POWER button to enter Data Reference mode, “MR” symbol display, meanwhile, it will automatically display data saved in the group 1. Then press HOLD button or POWER button to read the stored data by turning upwards or downwards in cycle. It will return to the group 1’s data automatically after reaching the last group’s data in storage.
Press POWER button for more than 3 seconds to exit from data reference mode, returning to receiving data mode. During the exit, it will show “End” symbol.
6. Data Deletion
Under data reference mode, press HOLD + POWER button to delete all the data in storage, and return to Data Reception mode. During the deletion of data, it will display “dEL” symbol.
7. Replacing Batteries
When the battery voltage is below 4.8V, the meter will display a symbol, indicating the batteries have no sufficient power content. Please replace batteries.
Power off, to make sure the meter is under the state of power off. To loosen two screws of the battery cover board, open the cover board to replace brand-new qualified batteries on. It should pay special attention on the battery specification and polarity, cover the board well and fasten the two screws.
Press POWER button to check whether the meter can be powered on normally. If not, please repeat the operation according the step 2.
8. Accessories

| Tester | 1 PCS |
| Receiver | 1 PCS |
| Insulation Rod (1M/Section) | 5 Sections |
| Meter Box | 1 PCS |
| Battery (Alkaline Dry Battery AAA) | 4 PCS(* or 8 PCS) |
| User’s Manual/ Maintenance Card/ Conformity Certificate | 1 SET |

