Description
Overview
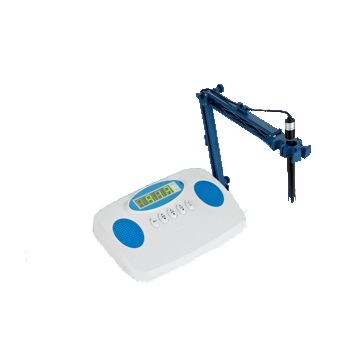
GAOTek PH Meter with mV and Temperature (Two Point Auto Calibration) is designed to measure the concentration of solution’s mV and pH value in the range from 0 ~ 14.00 pH. This pH meter has large screen with blue backlight, double digital LCD. It can simultaneously measure, display pH and temperature or potential (mV).It determines the electrode performance automatically and improve the work efficiency. It is applicable to the laboratory of universities, research institutes, environmental monitoring, industrial and mining enterprises, etc.
Key Features
- LED digital display
- Can display temperature value, PH value or potential value of MV at the same time
- Manual Temperature Compensation
- 1 to 2 point calibration
- Determine the electrode performance automatically, improve the work efficiency
- Low price, incredible value
- Simple effective
Technical Specifications
| pH | |
| Range | 0 ~ 14.00 pH |
| Resolution | 0.01 pH |
| Accuracy | ± 0.01 pH ± 1 digit |
| Input Resistance | >1 x 10¹² Ω |
| Stability | ± 0.01 pH ± 1 digit / 3 hours |
| Temperature Compensation | 32 °F to 140 °F (0 °C to 60 °C), manual |
| mV | |
| Range | -1999 mV ~ 0 ~ 1999 mV |
| Resolution | 1 mV |
| Accuracy | ± 1 mV ± 1 digit |
| Others | |
| Input Current | 2 x 10-12 A |
| Power Supply | AC 220 V ± 22 V, 50 Hz ±1 |
| Dimension | 11.81 in × 7.87 in × 3.54 in (300 mm × 200 mm × 90 mm) |
| Weight | 2.87 lbs.(1.3 kg) |
| Relative Humidity | ≤ 85 % |
| Operating Temperature | 41 °F to 104 °F (5 °C to 40 °C) |
Instrument Structure
Exterior Structure

1.Chassis
2.Keyboard
3.Screen
4.Multi electrical holder
5.electrode
Instrument Rear Panel

6.Electrode plug
7.Reference electrode connection
8.Fuse
9.Power
10.Power outlet
Keyboard explanation:
- Press Key “pH/mV” once for measuring “pH”: Press another time for measuring “mV”.
- Key “Stand”. Press “▲” key to adjust the localization value to increase . Press “▼” to adjust the localization value to decrease.
- Key “slope”. Press the upper “▲” to adjust the slope value to increase; Press the lower “▼” to adjust the slope values to decrease.
- Key “Temp”. Press the upper “▲” to regulate the temperature rise ; Press the lower “▼” to adjust the temperature
- Key “Yes”. Press the key to confirm the operation. Besides, turn the power switch on while pressing this key can restore the original state of the instrument.
Instrument case Accessories:


11 Q9 Short plug
12 PH composite electrode
13 Electrode protection set
Preparation

- Keep the multi-electrical holder into the Multi-function electrode holder socket, the pH composite electrode installed in electrode rack, Unplug the set and pull down the rubber of electrode to expose the sleeve hole.
- Clean electrode with distilled water
Sequence of Operation:

Calibration
Adjustment before utilize, Normally instruments in ceaseless utilize, align once every day.
- Unplug Q9 short-circuit plug (11) from electrode socket (6)
- Insert composite electrode (12) into electrode socket (6)
- If no composite electrode, insert glass electrodes plug into the electrode socket (6).Connect reference electrode to the reference electrode (7);
- Turn on the power switch, press “pH/mV” button make it into the pH measurement condition;
- Press “Temp” button to display the solution temperature (at this time temperature indicator light), then press “Yes” button, the instrument returns to pH measurement mode.
- Insert the electrode washed with distilled water into the pH = 6.86pH standard buffer solution ,when the reading is stable press the key” Stand”. Then press the “Yes” button the instrument is in pH measuring state. The relationship between buffer solution PH value and temperature see Appendix
- Insert electrode cleaned with distilled or deionized water into the pH = 4.00 (or PH = 9.18; or pH = 6.86 pH, but cannot the same with calibration buffer solution pH) standard buffer solution. Press the k “Model” button twice, then press the “Yes” button, the instrument is in pH measuring state, pH indicator stops flashing, calibration completed.
- After cleaning the electrode with distilled water, solution measurement may carry on.If the measuring process is not normal, turn off the power and press “Yes” button, and then turn on the power, measuring process restore the original state of the instrument. Restore the initial state of the instrument, and then re-calibrate it.Note: If the instrument is calibrated, do not press the “mode” button. If the user unknowingly touch the key, do not press the “confirm” button, instead continuously press the “Model” button, the instrument can be re-entering the pH measurement, without further calibration.
For the first time use the calibration buffer solution with pH = 6.86 for the first time and close to the pH values of solution being measured. If the measured solution is acidic, the buffer solution selected should be pH = 4.00; and for the alkaline solution, PH. = 9.18.
PH Value measurement:
Instrument calibrated can be used to measure solution; Specific steps are as per the following:
- Solution being measured has the same temperature with calibrated solution, steps are as follows:
- Clean electrode forehead with distilled water, and clean again with the solution being measured.
- Plunge the electrode in to the solution being measured, stir with a glass rod making the solution to be even the pH value displayed on the monitor
- Solution being measured has different temperature with calibrated solution, the steps are as follows:
- Clean electrode forehead with distilled water, and clean again with the solution being measured.
- Measured with a thermometer the temperature of the solution being measured.
- Press “Temp” button, the instrument displays the temperature of the measured solution, and then press “Yes” button.
- Plunge the electrode in to the solution being measured. Stir with a glass rod making the solution to be even, then read the solution pH.
Measurement of electrode potential (mV)
- Put the ion selective electrode (or metal electrode) and reference electrode holder on electrode stand;
- Clean electrode forehead with distilled water, and clean again with the solution being measured;
- Keep the ion electrode to the electrode socket plug (6)
- Connect reference electrode to the interface (7) at the rear of instrument
- Plug the two types of electrode into solution. When the solution is even, then you can read the electrode potential (mV) values
- If measured signal beyond instrument measuring range, the screen display is not bright.
Relationship table between buffer solution pH value and temperature
| °F(°C) | 0.05 mo1/kg Potassium hydrogen phthalate potassium acid |
0.025 mo1/kg Phosphate mixture |
0.01mo1/kg Sodium tetra borate |
| 41(5) | 4.00 | 6.95 | 9.39 |
| 50(10) | 4.00 | 6.92 | 9.33 |
| 59(15) | 4.00 | 6.90 | 9.28 |
| 68(20) | 4.00 | 6.88 | 9.23 |
| 77(25) | 4.00 | 6.86 | 9.18 |
| 86(30) | 4.01 | 6.85 | 9.14 |
| 95(35) | 4.02 | 6.84 | 9.11 |
| 104(40) | 4.03 | 6.84 | 9.07 |
| 113(45) | 4.04 | 6.84 | 9.04 |
| 122(50) | 4.06 | 6.83 | 9.03 |
| 131(55) | 4.07 | 6.83 | 8.99 |
| 140(60) | 4.09 | 6.83 | 8.97 |


