Description
Overview
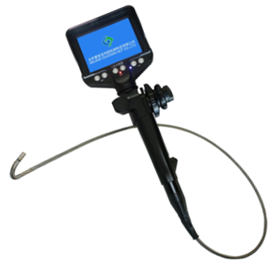
The GAOTek Portable Endoscope (Video Record) is a series endoscope which integrates probe and LCD in one system and battery, storage card and other accessories are combined into one handheld control unit. It combines electron, optics, precision machinery and other technologies and enables detection of narrow and bending areas which other equipment cannot reach. It is powered by high quality Li battery with more than 4 to 6 hours operation without field power supply and offers wide vision, high-resolution images and high performance/price ratio. Videos are stored as detection is conducted, any video recorded can be watched repeatedly and deleting and rerecording is permissible. It has a memory capacity of 32 GB and can be directly connected with computer via USB interface to upload and download data, and store, edit and print recording reports.
Key Features
- Compact, portable, light-weight and suitable for working aloft and in complex conditions
- Memory capacity of 32 GB
- 5 inch Color LCD monitor
- Light source in the form of adjustable LEDs
- CCD Camera with resolution of 0.4 m pixels
- High-quality Li battery with more than 4 to 6 hours operation
- Wide vision, high-resolution image and high performance/price ratio
- Videos are stored as detection is conducted
- Video recorded can be watched repeatedly
- Deleting and re-recording of videos permissible
- Can be directly connected to computer via USB interface to upload and download data
Technical Specifications
| Probe Diameter | 0.18 in (4.5 mm) | 0.24 in (6 mm) | 0.31 in (8 mm) | 0.39 in (10 mm) | |
| Probe Length | 1.38 in (35 mm) | 1.38 in (35 mm) | 1.38 in (35 mm) | 1.97 in (50 mm) | |
| Camera Direction | 2-way, Articulation ≥ 90 ° | 4-way, Articulation ≥ 90 ° | |||
| Sensor | CMOS | ||||
| Resolution | 0.4 m pixels | ||||
| Light Source | Adjustable LEDs | ||||
| Cable | 3.280 ft – 32.80 ft (1 m – 10 m) Optional | ||||
| Memory Capacity | Standard 8 G, Support Max 32 G | ||||
| Communication | USB, Plug and Play | ||||
| Display | 5 in color LCD | ||||
| Power Supply | AC/DC | ||||
| Power Supply Voltage | AC: 110 V – 240 V/DC: 5 V | ||||
| Working Temperature | 14 °F to 122 °F (-10 ℃ to 50 ℃) | ||||
| Weight | 4.41 lbs (2 Kg) | ||||
Additional Information
Applications of the Instrument
The applications of this endoscope include:
- Inspection of internal differences in the automotive engine and transmission,
- Wall corrosion and cracks in various small pipes, pipelines (i.e. exhaust duct),
- Construction
- Anti-terrorism search and rescue
- Safety inspections
- Archaeological findings and other fields.
Product Structure
There are two types of endoscopes – Manual type and Electric type.
1) Manual Type
Components of the Screen

- USB port
- Video output
- Card slot
- DC button
- Playback/ESC button
- DV button
- Set/OK button
- Power button
- Screen
- Light -/+
Components of the Handle

2) Electric Type Industrial Endoscope

- USB port
- Video output
- Card slot
- DC button
- Playback/ESC Button
- DV button
- Set/OK button
- Probe
- Power button
- Screen
- Probe knob
- Light -/+
- Battery compartment
- Charger
- Tail cap
Operating Instructions
Turn Endoscope ON/OFF
- Turn Endoscope ON
The control unit includes POWER button on top of it. Pressing the POWER button will turn on the display, and one indicator will illuminate blue. The display will show the live image for inspection. Power and storage capacity are shown on top of the display.

- Turn Endoscope OFF
To turn off the endoscope, press POWER button for 3 seconds. After use of the device, uninstall control unit, handle, probe, and cable. Place them into a carrying case.
Basic Operations
Adjust Probe Articulation
- Manual type: The probe can be adjusted clockwise or counter clockwise by twisting the direction knob on the handle.
- Electric type: The probe can be adjusted clockwise or counter clockwise by twisting the direction knob on the control unit.
Adjust Light
With the buttons “-” and “+” on the control panel, the light intensity of probe tip can be adjusted from none to strong brightness.
Lock the Screen
Turn on the endoscope to access live images, press SET button once and the screen will be locked, the icon ![]() will be shown on the screen; press SET button again, the screen will be unlocked.
will be shown on the screen; press SET button again, the screen will be unlocked.
Menu
Press (Set)button to show the Menu. To select an item, press (Down/ DC) button, (Up/DV)button and press Set button to confirm, and press Playback button to return.
- Playback: is used to select photos or video to be reviewed.
- Language: English, German, French, Spanish, Italian, Portuguese, Traditional Chinese, Simplified Chinese, Japanese.
- Date / Time: is used to adjust current time by pressing up/down buttons, and press “Set” button to confirm.
- LCD Off: is used to select standby time from 5 minutes or 10 minutes, the default is off.
- Auto Power Off: to select automatic power off time from 10 minutes or 30 minutes, the default is off.
- Sequence: is used to select Single /Sequence /3 Sequence, the default is Singlet.
- Recording time: is used to select recording time from 5 minutes/10 minutes/15 minutes, the default is off.
- Format: is used to format the memory card.
- Color: is used to adjust the brightness, chroma, contrast ratio of the display, press up/down buttons to select, and press “Set” button to confirm.
- Default Setting: is used to restore the factory default.
Take Pictures and Record Videos
Take Pictures
Turn on the endoscope to access live images, press (DC) button, the camera icon ![]() flashes once, indicating a picture is taken.
flashes once, indicating a picture is taken.

Record Videos
Turn on the endoscope to access live images, press (DV) button, a red dot ![]() flashes, indicating a video is being recorded. Press (DV) button again to stop.
flashes, indicating a video is being recorded. Press (DV) button again to stop.

Playback, Delete and Transfer Images
Playback
- To review videos and pictures recorded, press (Playback)button to show all the files; press (DC), (DV)button to select a file.
- Press (Set) button to preview the pictures and video selected, and press(Set)button again to playback.

Delete files
To delete files recorded, select the files in playback or preview interface first, and press (Set)button, and select “Delete Current” or “Delete All”, press(Set) button to select “Cancel” or “OK”, and press (Set) button to confirm and delete files.
Transfer files
- Through USB Port: Turn on the control unit, connect the endoscope with computer via USB cable, and press (Set) button to select “Storage card” to download files.
- Through Memory Card: Take out memory card and connect card reader to computer to download files recorded.
Troubleshooting
- Press Power button, but the endoscope cannot be turned on. Battery power is low, replace or recharge the battery and turn on the endoscope again.
- The endoscope cannot record videos. The capacity of SD card remains less than 100 MB, replace SD card or delete files in card to leave space.
- To know the battery is being recharged: While charging the battery, the indicator on the charger shines red; when the charging is completed, the indicator shines green.
- Probe is connected, but the display does not show images. Check the battery status, if battery power is low, replace or recharge the battery.
- The system does not work in the operation process. Remove the battery from the control unit, and install it again, turn on the endoscope.


