Description
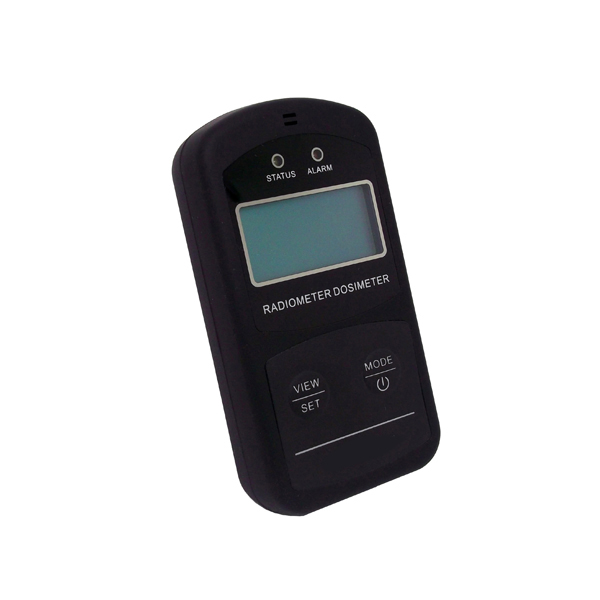
GAOTek Light Weight Radiation Meter (X, γ and Hard-β Rays) is designed for radiation pollution detection with the radiation equivalent dose rate (EDR) from 0.01 µSv/h to 10000 µSv/h.It is used in environmental radiation detection, the soil surface radiation pollution detection, and Agricultural radiation pollution detection .The meter has a wide range of applications like the measurement of personal gamma and X-ray radiation equivalent dose rate (EDR), measurement of personal gamma and X-ray radiation equivalent dose(ED), alarm of exceeded programmed threshold levels.
Key Features
- Ore, building materials radioactive detection
- Personal dose monitoring alarm
- Industrial X, gamma NDT radiation detection
- Radiation medical treatment place radiation detection
- Cobalt source, electronic accelerator irradiation place radiation detection
- Radioactive radiation laboratory detection
Technical Specifications
| Types of Measured Ray | X, γ and hard-β rays |
| Measurement Range | |
| Radiation Equivalent Dose Rate(EDR) | 0.01 µSv/h ~ 10000 µSv/h |
| Radiation Equivalent Dose(ED) | 0.00 µSv ~ 9999 Sv |
| Energy Ranges of Measurement | 40 KeV ~ 3.0 MeV |
| Relative Errors of Energy Dependence(137Cs) | Less than or equal ±25% |
| Basic Relative Errors | Less than or equal ±15% |
| Response Time of Alarm | Less than or equal 5seconds |
| Display unit | |
| EDR | (µSv/h,mSv/h,Sv/h ) |
| Count Rate | cpm |
| ED | (µSv,mSV,Sv) |
| Power | One AAA battery |
| Dimension | 4.13 in x 2.136 in x 1.02 in (105 mm x 55 mm x26 mm) |
| Weight | 0.176 lbs (80 g) (excluding battery) |
Additional Information
Operation panel


The operation panel of the instrument consists of LCD display, Alarm indicating lamp, Pulse indicating lamp, Function key “MODE/POWER” and Function key “SET/VIEW”. The LCD display may show the current time, mode, dose rate, accumulated dose value and battery power.
LCD display

User Interface Icons
| Icon | Indication |
| |
Sound |
| |
Vibration |
| |
Light |
| |
Impulse (acousto-optic indicating signal for different frequencies is given according to radiance) |
| |
Alarm clock |
| |
Battery power |
| RATE | Dose rate |
| DOSE | Accumulated dose |
| µSv/h | Dose rate unit (Sievert): µSv/h, mSv/h |
| mSv | Accumulated dose unit: µSv, mSv |
Functions
- Alarm of exceeded programmed threshold levels
- Retention of maximum EDR
- Clock and alarm clock
- Light indication for pulse: to give light indications of different frequencies based on the strength of radiation – the stronger the radiation is, the higher the frequency is.
- To save radiation equivalent dose(ED) and parameters: the instrument will automatically save the radiation equivalent dose(ED) and parameters at an interval of every ten minutes.
A.Operation description of the functional keys
Introduction to the keys
The instrument has two keys, i.e. “MODE/POWER” and “SET/VIEW”, as shown in (Figure Front View)
1. Function of key “MODE/POWER”:
- Turn on/turn off
- Switch measuring modes
- Setting selection
2.Function of key “SET/VIEW”:
- View the alarm value
- Enter the setting mode
- Parameter setting
Operation of the keys
Turn on and Turn off
Turn on: the instrument will start up automatically after the battery is installed, and the equivalent dose rate (EDR) measurement mode will be enabled automatically; or hold down the key “MODE/POWER “when the instrument is off to turn on the instrument.
Turn off: hold down the key “MODE/POWER” when the instrument is on to turn it off.
Interface switch
The working Interface can be switched when key “MODE/POWER” is pressed.
Interfaces: equivalent dose rate (EDR), equivalent dose(ED):, maximum equivalent dose rate, clock and alarm clock.
B.Interfaces switch and parameter setup
Equivalent dose rate interface and parameter setup
Equivalent dose rate
In the equivalent dose rate interface, the RATE icon, the currently measured equivalent dose rate and unit are displayed. The equivalent dose rate is refreshed every second, and the measurement unit will automatically switch to uSv/h or mSv/h according to the value of the equivalent dose rate.

View and Setup the EDR Mode and alarming value
In the equivalent dose rate interface, press key “SET/VIEW”, and the alarm value of the equivalent dose rate and “RATE ALARM VALUE” icon will be displayed . It will automatically return to the equivalent dose rate measurement interface after 6 seconds.

Hold down key “SET/VIEW” for 3 seconds, it will enter into the setting interface of alarming mode and alarm value.
In this interface, first need to set the alarm mode; if the icon flashing, it indicates the corresponding function can be set. Press key “SET/VIEW” to turn on or turn off the current function. “ON” indicates the current function is enabled ; “OFF” indicates the current function is not enabled.


If it is unnecessary to change the current option, press key “MODE/POWER “to switch to the next function. The mode of the sound, vibration, light and pulse can be set in sequence.
When the pulse work indicating icon is flashing, press the key “MODE/POWER “again, then the unit of equivalent dose rate alarm value (uSv/h) will flash, press key “SET/VIEW” to select proper alarm value unit. In practice, “uSv/h “is generally selected . After the unit of alarm value is selected and confirmed, press key “MODE/POWER” again, at this time, the rightmost digit of the alarm value will flash; press key “SET/VIEW”, a proper digit from 0 to 9 can be selected; then press key “MODE/POWER “again to set the next bit digit; when all bits of the alarm value have been set, then press key “MODE/POWER” ,at this time, all digits flashing; 6 seconds later, the setting will be automatically saved, and it will return to the equivalent dose rate measurement interface.
Note: During setting interface, if no key is operated more than 6 seconds, the instrument will automatically save the setting and return to the measurement interface.

Equivalent dose(ED) interface and parameter setup
Equivalent dose(ED) interface
In the equivalent dose(ED) interface, the display shows “DOSE” icon, the current equivalent dose value and unit. The measurement unit will automatically switch among uSv, mSv and Sv according to the equivalent dose value.

View and set up the alarm value of equivalent dose(ED)
In the equivalent dose(ED) interface, press key “SET/VIEW” to show the equivalent dose alarm value and unit, as well as the “DOSE ALARM VALUE” icon.

Hold down key “SET/VIEW” for at least 3 seconds it will enter the interface of setting equivalent dose(ED) alarm value. Select the unit of alarm among uSv, mSv and Sv first; After the unit of alarm value is selected and confirmed, press key “MODE/POWER” again, at this time, the rightmost digit of alarm value flashes; press key “SET/VIEW”, and the digit can be modified. The operation is the same with that of setting the equivalent dose rate alarm value. After setting of the four digits of the alarm value is completed, press key “MODE/POWER” again, and the equivalent dose value will flash; at the same time, the “DOSE VALUE” icon will be displayed.

At this time, if key “SET/VIEW” is pressed, the “dEL “icon will be displayed (Figure 10), indicating to delete the equivalent dose value. If there is no need to delete the equivalent dose value, please press the key “SET/VIEW “again to switch to the equivalent dose value flash, and then press key “MODE/POWER” for confirmation. it will automatically quit the current interface. If no operation is done more than 6 seconds, the instrument will confirm the current setting and return to the equivalent dose interface.

Note: the equivalent dose value cannot be restored once deleted. Therefore, please record it before operation.
Maximum equivalent dose rate interface
In the maximum equivalent dose rate interface, the “RATE MAX “icon and the maximum equivalent dose rate measured during the measuring process will be displayed .

In the maximum equivalent dose rate mode, hold down key “SET/VIEW” to enter the reset interface; press key “SET/VIEW” again to select whether to reset; when all digits are zero, it means to reset; when the dose rate is displayed, it means not to reset; then press key “MODE/POWER” for confirming the operation.
Clock setup
“TIME” icon and the current time are displayed.

In the clock interface, hold down key “SET/VIEW” to enter the clock setting interface, at this time, the clock can be set.Similar to the setting of alarm value, key “SET/VIEW” can be used to change the digits and key “MODE/POWER” can be used to adjust positions of the digits.The clock setting includes hour, minute, month, date and year. After the leftmost digit of hour is set, press key “MODE/POWER” to set month and date , and the “–” icon is displayed in the middle.After the leftmost digit of month is set, press key “MODE/POWER” to set year.Press key “SET/VIEW”, the currently flashing digit can be modified.

If no operation is done more than 6 seconds, the instrument will confirm the current setting and return to the clock interface.
Alarm clock setup
“ALARM TIME” icon and preset alarm clock time will be displayed

In the alarm clock interface, hold down key “SET/VIEW” to enter the alarm clock setting interface. First, select whether to turn on the function of alarm clock. When the “ON” icon is displayed, indicating the alarm clock is set on; when “OFF” is displayed, indicating the alarm clock is set off.
After the function of alarm clock is set, press key “MODE/POWER “again, and the time value of the alarm clock will flash; press key “SET/VIEW”, and the digital value can be modified; press key “MODE/POWER”, it will switch to the next digit. After setting of the four digits is complete, press key “MODE/POWER”, and the four digits will flash simultaneously. If no operation is done more than 6 seconds, the instrument will confirm the current setting and return to the alarm clock interface.
Explanation of other prompts
Prompt for low battery
When the battery is low, the battery icon on the upper right corner will be empty and flash. At the same time, the “Lobt” icon will be displayed every 3 seconds . When low battery is indicated, please replace the battery in time, otherwise, it will result in inaccurate measured data or abnormal work of the instrument.

Prompt for Err1 and solution
If the “Err1” icon is displayed, it means the sensor has not detected any signal within 120s.

Solutions:
- Low battery may results in abnormal work of the instrument. Replace the battery, and the problem can be solved.
- The sensor has been damaged or the corresponding circuit fails. If the problem has not been solved by replacing the battery, the instrument shall be returned to the factory for repairs.


