Description
Overview
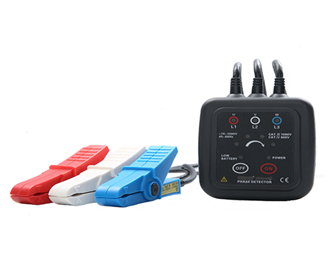
GAOTek Phase Meter with Wire Examination is a highly reliable instrument to perform phase sequence detection, live wire examination, simple power detection, FireWire identification, phase deficiency determination, break location detection, DC line break and line maintenance. The test can be performed by non-contact measurement where the three-phase insulating sheath is clamped directly to the three super-sensitive highly insulated clamps. It is composed of a magnetic base plate which eases the operations.
Features
- Reliable and Convenient to use
- Pollution level 2, CAT Ⅲ (600 V), Transient over-voltage 6000 V
- Battery life of 200 hours
- Intuitive and clear LED dynamic display
- Ultra- low power consumption
- Performs multiple functionalities
- Boot indication
- Automatic power off after 3 minutes of idle time
Technical Specifications
| Power supply | DC 3 V AA Mn batteries (R6P) × 2 PCS. Can perform continuously for 200 Hours |
| Live voltage range | AC 70 ~ 1000 V, 45 Hz ~ 65 Hz (Sine Wave Continuous Input) |
| Clamp wire size | Diameter ø 0.06 – ø 0.6 in (ø1.6-ø16 mm) |
| LED display | [Positive Phase Sequence] The Four Phase-Sequence Lamps Blink in Order (Clockwise)
[Negative Phase Sequence ] The Four Phase-Sequence Lamps Blink in Order (Counter-clockwise) [Live-Voltage Indication] L1, L2, L3 Lamps Light Up [Default Phase] L1/L2/L3 Lamp is Off [Open Circuit] L1/L2/L3 Lamp is Off |
| Meter dimension | Width× Height × Thickness: 2.7 in × 2.9 in × 1.1 in (70 mm × 75 mm × 30 mm) |
| Clamp lead length | 1.9 Ft (0.6 m) |
| Meter weight | 0.4 lbs (0.2 Kg) (With Battery) |
| Working temperature and humidity | 14 °F ~ 131 °F (-10 °C~55 °C); Below 80 % RH |
| Storage temperature and humidity | -4 °F ~ 140 °F (-20 °C ~ 60 °C); below 90% RH |
| Maximum measured voltage | AC 1000 V |
| Dielectric strength | 5.4 kV rms |
| Maximum rated power | 300 mVA |
Additional Information
Warning
- Pay special attention to safety under any circumstance while using the instrument
- Take note of the label text and symbols on the panel and back of the instrument
- Check the instrument, lead wire and clamps. Make sure no damage is caused to the instrument
- Please don’t touch an exposed wire during measurement
- Keep the clamp clean and maintain it regularly
- Please don’t place and store the instrument in a place with high temperature, humidity, moisture condensation and direct sunlight for a long time
- Remove or replace the battery if you expect not to use the instrument for a long time
- Take note of the polarity when replacing the battery. Move the clamps away from the wires and replace the batteries
- The operation, demolition, calibration and maintenance of the instrument must be carried out by qualified personnel authorized to do so
- The meter should be stopped from being used immediately and sealed if any danger is caused in case of continued use; Only a competent body can be authorized to deal with it
- “
 ” in the manual is the safety warning sign. The contents of the manual must be followed for safe operation
 - “
 ” is the other safety signs. The contents of the manual must be followed for safe operation
Electrical Symbols
| Extremely dangerous! The operator must strictly abide by the safety rules; otherwise there is risk of electric shock, resulting in injury or fatalities | |
| Warning! Safety rules must be strictly abided by, otherwise personal injury or equipment damage may be caused | |
| Alternate Current(AC) | |
| Direct Current(DC) | |
| Double Insulation |
Model
| Model | Diameter of wires can be clamped |
| GT00Y900ZX | ø 0.06 in – ø 0.6 in |
Instrument Structure

- Operation indicating panel
- Clamps
- Lead Wire
- Instrument body
- L1 indicator lamp
- L2 indicator lamp
- L1 indicator lamp
- Phase sequence indicator lamp (4 lamps)
- Battery, voltage indicator lamp
- Power on indicator lamp
- ON power key
- OFF power key
- Connecting screws
- Magnet
- Battery cover board
Method of Operation
- Phase sequence detection
- Connection: Clamp three phase wires with the three clamps respectively and arbitrarily (Shown in Fig-1)
- Put the wires at the position marked with (Shown in Fig-2)


-
- Press the red ON power key, the power indicator lamp lights up. If the lamp can’t light up, it indicates that the battery has low power or check the instrument. In this case, please change the batteries or repair the instrument
- If the 4 phase sequence indicator lamps light up in clockwise order and the buzzer sounds intermittently, it is positive phase sequence L1-L2-L3 (U-V-W) (Shown in Fig-3). If the 4 phase sequence indicator lamps light up in counter-clockwise order, and the buzzer sounds continuously, it is negative phase sequence L3-L2-L1 (W-V-U).


- Press white OFF power key, the power will be turned off automatically if the instrument remains idle for 5 minutes after the device is turned on to reduce power consumption.
- Live wire examination, power inspection
- Clamp one wire with any one clamp, if it is an electrified wire (AC 70 – 1000 V), then L1/U, L2/V or L3/W lamps will light up to check whether the wire is electrified
- Clamps and lamps corresponding table:
| Clamp used | Lamp to light up |
| L1/U (Yellow) | L1/U lamp only |
| L2/V (Green) | L2/V lamp only |
| L3/W (Red) | L3/W lamp only |
- Phase deficiency judgment, breakpoints finding, breakpoints positioning
- Clamp three phase wires with one clamp, in turn if there is a phase deficiency, L1, L2 or L3 lamps won’t light up
- Clamp one wire with any one clamp and move the clamp along the wire. If the L1, L2 or L3 lamps won’t light up, it means the section wire before this point has a break. Shorten the range of detection to find out the breakpoints accurately. It is a convenient and safe method for wire maintenance.
Battery Replacement
Pay attention to the polarity of batteries!
- Make sure the clamps are moved away from wires before replacing the batteries for measurement
- Turn OFF the power (Figure A)
- Loosen the screw and then remove the battery cover (Figure B)
- Replace the batteries with new ones (Figure C)
- Put the battery cover back in place and tighten the screw (Figure D)
- Turn ON the power to check whether the batteries are successfully replaced, repeat step 2 if it does not work

Trouble shooting
| Symptoms | Possible Causes | Remedies |
| Cannot power on (LED power indicator lamp is off, without any display) | No batteries | Set the batteries |
| Wrong battery type | Replace with right type | |
| Insufficient capacity of battery | Replace the batteries | |
| Faulty battery polarity | Install batteries in correct polarity | |
| Poor contact of battery contacts | Replace the battery contacts | |
| Battery cover not completely covered | Cover it again | |
| Defect of circuit component | Repair or replace the PCB | |
| LED dim display | Insufficient capacity of battery | Replace the batteries |
| Incapable of measurement | The three phase wires
are not electrified |
Does not belong to instrument faults |
| Failed to clamp the wire | Clamp again referring to the manual | |
| Lead wire break | Change the lead wire | |
| Defect of circuit component | Repair or replace the PCB |
Assembly Details

Accessories
| Main Unit | 1 piece |
| Box | 1 piece |
| Strap | 1 piece |
| 5# manganese alloy batteries (R6P) | 2 piece |
| Manual | 1 copy |
| Guarantee Card | 1 copy |
| Certification | 1 copy |


