Description
Overview
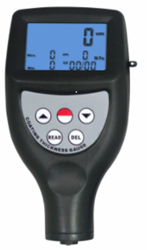
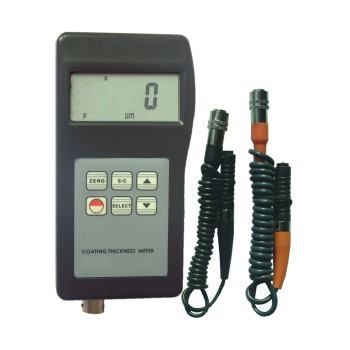
GAOTek Coating Thickness Gauge with Data Memory (F and NF Type) can store data in 99 groups and is designed to measure the thickness of non-magnetic materials in the measuring range from 0 µm ~ 1250 µm. The thickness of non- magnetic materials can be measured using F-probe and non-coating on non-magnetic materials using N- probe with single and continuous measurement mode. This gauge can be used both in the laboratory and in harsh field conditions. It complies with ISO 2178, ISO 2361, DIN, ASTM and BS standards.
Key Features
- Two measurement mode: Single and Continuous
- Two measuring methods: magnetic induction (F) and eddy current (N)
- Metric/Imperial conversion.
- Wide measuring range and high resolution.
- Integral type suitable for single-hand operation, large probe with large contact surface have better stability, and users can get continuous, good repetitive and precise measurements.
- Manual or automatic shutdown.
- Provide Bluetooth data output choice.
- Automatic memory of calibration value, and automatically recognize the substrate.
- Can communicate with PC computer for statistics
- Digital backlit display gives accurate reading.
- Can store the new data in 99 groups.
- Operation process have buzzing reminder.
Technical Specifications
| Working Principle | F- Magnetic Induction
NF-Eddy current |
| Measuring Range | 0 µm ~ 1250 µm/ 0 mil ~ 50 mil |
| Resolution | 0.1 µm/ 1 µm |
| Accuracy | ± 1 % ~ 3 % or ± 2.5 µm |
| Minimum Radius Workpiece | F Type: convex 0.06 in (1.5 mm) /
concave 0.98 in (25 mm) NF Type: convex 0.12 in (3 mm) / concave 1.97 in (50 mm) |
| Minimum Measuring Area | 0.24 in (6 mm) |
| Minimum Sample Thickness | 0.01 in (0.3 mm) |
| Data Memory | 99 Groups |
| Metric/Imperial | Yes |
| Battery Indicator | Yes |
| Automatic Power Off | Yes |
| Power Supply | 2 x 1.5 V AAA (UM-4) battery |
| Dimension | 4.96 in × 2.56 in × 1.38 in (126 mm × 65 mm × 35 mm) |
| Weight | 2.86 oz. (81 g) |
| Operating Humidity | 10 % ~ 90 % rh |
| Operating Temperature | 32 ˚F ~ 104 ˚F (0 ˚C ~ 40 ˚C) |
Additional Information

3-1 Probes Inbuilt
3-2 Display
3-3 Power/Zero Key
3-4 Plus Key
3-5 Minus Key
3-6 Reading Key
3-7 Deleting Key
3-8 Jack forRS232C
3-9 Battery cover
3-10 Wrist Ring

3-11 Low Battery Indicator
3-12 Measuring Symbol
3-13 Last Reading /Browsing Value
3-14 Single Measurement Mode
3-15 Max. Indicator Value
3-16 Min. Indicator Value
3-17 Browsing State
3-18 Measuring State
3-19 Unit
3-20 Average Indicator
3-21 Substrate Indicator
3-22 Counter for Storing
3-23 Counter for Statistics
MEASURING PROCEDURE
- Press the power key to switch on the power and ‘0’ displays on the Display. The gauge will restore the last operation on display itself, with ‘Fe’ or ‘NFe’ symbol shown on the display. The gauge enters the auto mode which can automatically recognize the substrate itself.
- Press the probe on a coating layer to be measured. The reading on the display is the thickness of the coating layer. The reading can be corrected by pressing the Plus key and minus key while the probe is away from the substrate or the measurement body.
- To take the next measurement, just lift the probe more than 1 cm and then repeat the step above. The gauge can memorize the continuous measuring value automatically with statistic measurement times, meanwhile, the max, min and average value will show on Display.
- To change the measurement unit ‘um’ or ‘mil’ by Depressing Power key and not releasing it till ‘UNIT’ on the Display and then pressing Zero key (3-3).
- To change measurement mode from the single to continuous or vice visa, just depressing Power key and not releasing it till ‘SC’ on the Display and then pressing Zero key (3-3). The symbol ‘STATS’ represents single mode.
STATISTICS
The gauge calculates and displays a statistical analysis of readings as they are taken.
The statistics available are:
- Last value
- Mean value marked by Ave
- Highest Reading marked by Max
- Lowest Reading marked by Min
- Number of Readings taken
To clear the statistical data when starting a new set of data, just press and release the ZERO key. In the measurement mode marked by SV, last value could be deleted by pressing the ‘DEL’ key and re-statistics is calculated and displayed itself.
STORING AND RECALLING READINGS
- Readings taken are automatically saved to the memory of the gauge. The memorized data can be browsed by pressing and releasing the ‘RD’ key to enter into the browsing state marked by ‘READ’ on the display.
- In the browsing state, all the readings memorized can be recalled on the display by depressing the plus key ‘▲ ‘ or the minus key ‘▼’.
- To delete the memorized value in the memory, just locate the reading to be deleted by the key ‘▲ ‘ or ‘▼’, then press and release the key ‘DEL’. If there is an “Err0” on the display, it indicates there is no reading to delete anymore.
- To quit to the measurement state, just depress the ‘ZERO’ key.
DELETING READINGS
- To delete a reading on the display, just press the key ‘DEL’ no matter in the measurement state marked ‘SV’ or in the browsing state marked by ‘RD’. Go into the browsing state by ‘RD’. Go into the browsing state by pressing the ‘READ’ key while entering the measurement state by pressing the ‘ZERO’ key.
- To delete all the readings in the memory, just depress the ‘DEL’ key in the measurement state marked by ‘SV’ on the display for about 4 seconds till the number of readings memorized becomes 0.
TRANSFERRING READINGS TO A COMPUTER
- Install the RS232 software on your PC, Click the ‘continue’ button in the installing process.
- Connect your gauge to your PC using the optional cable.
- Switch on your gauge and ensure the reading screen is displayed.
- Start the software and follow the instructions included with the software Demo.EXE.
CALIBRATION
- Zero adjustment
Zero adjustment for ‘Fe’ and ‘NFe’ should be carried out separately. Take the iron substrate if ‘Fe’ on Display, while take the aluminum substrate if ‘NFe’ on the Display. Place the probe (3-1) on the substrate steadily. Press the zero key (3-3) and ‘0’ will be on the Display before lifting the probe. If pressing the ZERO key but the probe is not placed on the substrate or an uncoated standard. The zero adjustment is invalid.
- Select an appropriate calibration foil according to your measurement range.
- Place the standard foil selected onto the substrate or the uncoated standard.
- Place the sensor (3-1) mildly onto the standard foil and lift. The reading on the display is the value measured. The displayed reading value can be adjusted by pressing the plus key (3-4) or minus key (3-5) while the probe is away from the substrate or the measured body.
- Repeat step 4 until the result is correct.
BATTERY REPLACEMENT
- When it is necessary to replace the battery, i.e. battery voltage less than 2.2V, the battery symbol will appear on the Display.
- Slide the Battery cover and remove the batteries.
- Install the batteries (2 x 1.5 V AAA/UM-4) correctly into the case.
- If the instrument is not to be used for longer period, remove the batteries.
CONSIDERATIONS
In order to weaken the influence of the measured material on the accuracy of measurement, it is recommended that the calibrations should be done on the uncoated material.
RESTORE FACTORY SETTINGS
- When to restore
It is recommended to restore factory settings in one of the following cases.
- The gauge does not measure any more.
- Measurement accuracy is degraded caused by environmental conditions change greatly.
- How to restore?
Restore factory settings includes ‘Fe’ setting and ‘NFe’ setting. You can restore one of them or both of them respectively. Please follow procedures below to restore factory setting.
- Please note the symbol on the display is ‘Fe’ or ‘NFe’. If ‘Fe’ is on the display, the operation below is restoring the factory setting for ‘Fe’ type, and if ‘NFe’ is on the display, the operation below is restoring the factory setting for ‘NFe’ type.
- Depress Power key and not release it till ‘CAL’ appears on the Display. It is about 12 seconds from starting depressing Power key.
- When F:H or nF : H is on Display, lift the probe more than 5 centimeters, then press the Zero key again and the gauge return to measurement state. The factory setting is restored. Remember, to restore setting is restored. Remember, to restore factory setting should be done within 6 seconds at every stage. Or the gauge will quit itself and restoration is invalid.
Notes
- Settings includes restoring factory setting, unit setting, S/C setting, which should be done within 6 seconds at every stage, or the gauge will quit itself and keep its status before.
- It is strongly recommended that no changes should be done to the value of Ln. It affects the accuracy. Changing Ln can be done by pressing and holding the Power key for about 14 secs. It is value can also be changed by pressing Plus or Minus Key. Ln value can be adjusted only by experienced professional under the circumstance where the probe need to be replaced or to make the gauge to give more accurate readings. Generally, the larger the value of Ln, the smaller the reading on a same thickness. Little variation of value of Ln will cause a great change in reading at high end (e.g. at 500 um/20mil).The rules to adjust the value of Ln are as follow:
A.Reading at low end can be adjusted to the exact value by the plus or minus key.
B.To enlarge the Ln if reading at low end (e.g. at 51 um) is ok but reading at high end (e.g. at 432 um) is too large. On the contrary, to decrease the Ln if reading at low end (e.g. at 51 um) is ok but reading at high end (e.g. at 432 um) is too small.
C.Repeat procedures from A to B till the readings on the every standard foil are satisfying the accuracy.


