Description
Overview
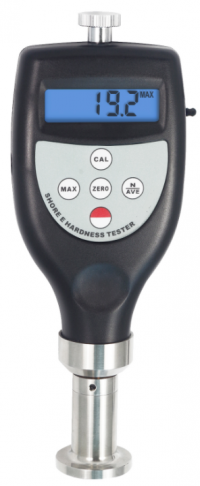
GAOTek Shore Hardness Tester with Average Calculate Function is designed to determine the indentation hardness of materials ranging from cellular products to rigid plastics. Hardness result, average value and peak value function are some of the features of this tester. It has a four digit digital display which gives exact reading. The exclusive micro-computer LSI circuit and crystal time base offers high accuracy measurement. It complies DIN 53505, ISO 868, ISO 7619, ASTMD 2240 and JISK7215 standards.
Key Features
- It meets standards of DIN 53505, ISO 868, ISO 7619, ASTMD 2240, and JISK7215.
- With average calculate function.
- Peak value deposit function.
- Under-voltage alarm function.
- Use “USB data output” and “RS-232 data output” to connect with PC.
- Provide “Bluetooth data output” choice.
- Digital display gives exact reading with no guessing or errors and displays 4 digits in a 0.39 inch (10 mm) LCD
- Used the exclusive Micro-computer LSI circuit and crystal time base to offer high accuracy measurement.
- Can communicate with PC for recording, printing and analyzing with help of optional software and cable for RS232C interface.
- Automatic power off to conserve power.
- Use operation stand of optional parts can get good accuracy and repetitiveness due to constant measurement force to eliminate the errors caused by artificially applied different force.
Technical Specifications
| Unit | HE |
| Range | 10 ~ 90 HE |
| Accuracy | < ±1% H |
| Resolution | 0.1 H |
| Battery Indicator | Low Battery Indicator |
| Display | 4 digits, 0.39 in (10 mm) LCD |
| Auto Switch Off | Yes |
| PC Interface | RS232C interface |
| Power off
|
1. Manual off
2. Auto power off |
| Power Supply | 4 x 1.5 V AAA Size (UM-4) Battery |
| Dimensions | 6.37 in x 2.5 in x 1.1 in (162 mm x 65 mm x 28 mm) |
| Weight | 6.1 oz. (173 g) Batteries not included |
| Operating Humidity | < 80% RH |
| Operating Temperature | 0 ◦F to 122 ◦F (0 ◦C to 50 ◦C) |
Additional Information
Accessories:
- Test block
- Operation manual
- Carrying case
Optional accessories:
- Cable and software for RS232C
- Bluetooth adapter with software
- Measurement Stand
| Type | Typical Examples | Durometer hardness | Material thickness |
| Shore Hardness Tester | Soft rubber, highly elastic materials, plastically reformable materials | Above 90 DO Below 20 A | 0.24 in (6 mm), ASTM D 2240 |
Front Panel Description

4-1 Sensor 4-8 CAL key
4-2 Display 4-9 Indicator of Maximum value
4-3 Power key 4-10 Indicator of Average value
4-4 Max hold key 4-11 State of average value
4-5 Zero key 4-12 Number of measurements in the state of
4-6 N/Average key average value
4-7 RS232C interface
MEASURING PROCEDURE
Test specimen
-
- The minimum thickness is specified in a different standard, see part 1. Specimen should allow measurement to be taken at least 0.47 inch (12 mm) from any edge. Specimen surface should be flat and parallel to allow the presser face to contact to the specimen over an area which has a minimum radius of 6mm from the durometer probe. The specimen may be constructed with layered pieces to achieve the necessary thickness requirements, however measurements taken on these specimens may not agree with those made on solid specimens, due to the surface faces between layers not being in complete contact.
- Depress and release the “Power key” to power the tester on.
- Depress the “MAX” key till the mark MAX shows on the display.
- Hold the durometer vertically with the point of the indenter at least 0.47 inch (12 mm) from any edge. Apply the presser foot to the specimen as rapidly as possible, without shock, keeping the foot parallel to the surface of the specimen. Apply just sufficient force to obtain firm contact between the presser foot and the specimen. Hold for 1 or 2 seconds, the maximum reading can be obtained automatically.
- To take the next measurement, just depress the “Zero key” and repeat step 4. On the other hand, you can depress the “Max hold key” till the mark MAX disappears from the display. And then repeat the step 3 and 4.
- If other than a maximum reading is needed, no need to set the mark “MAX” showing on the display. In such case, the reading on the display is an instant value. Just hold the durometer in place without motion and obtain the reading after the required time interval (Normally less than 1 second).
- How to take average value?
- To take the average value of many times of measurements, just depress and release the “N/AVE key” to make the symbol “N” showing on the display, followed by a digit between 1-9 with the prefix “No.”. Here the digit is the times of measurements used to calculate the average value. Every time depress and release the “N/AVE key”, the digit will increase 1. And the digit will become “1” while depressing the “N/AVE key” at “9”.
- Adjust the digit to the number needed and depress “MAX key” or “Zero key” to return to the measurement state or wait for several seconds till “0” on the display.
- Take measurements as per steps from 3 to 5. Be sure that every test should be 0.23 inch (6 mm) apart. Every time take a measurement, the reading and the times of measurements show on the display. When the times of measurements is equal to the number set, the unit first displays the reading of the last, and then display the average value of last “N” measurements, followed by 2 beeps, with a symbol “AVE” indicating on the display.
- To take the next average value, just repeat the step 3.
- To release from average measurement, just depress the “N/AVE” till “N” disappears.
Calibration Check
To check whether the tester is accurate, just insert the indenter into the hole of the calibrated test Block. Apply enough force to make firm contact between the top surface of the test block and the presser foot. The reading should agree with the value stamped on the test block. If not, just carry out Zero calibration and High end calibration.
Zero calibration
Hold the durometer vertically with the point of the indenter hanging in the air, the reading on the display should be “0”. If not, depress the “Zero key” to make the tester display “0”.
High end calibration
Just place the indenter onto a flat glass, apply enough force to make firm contact between the glass and the presser foot. The readings on the display should lie between 99.5 and 101. If not, press “CAL key” to carry out high end calibration.
BATTERY REPLACEMENT
- When the battery symbol appears on the display, it is time to replace the batteries.
- Slide the Battery Cover away from the tester and remove the batteries.
- Install batteries paying careful attention to polarity.


