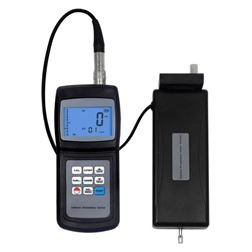
Description
Key Features
- Compatible with four standards of ISO, DIN, ANSI and JIS.
- Multiple parameter measurement: Ra, Rz, Rq, Rt.
- Highly sophisticated inductance sensor.
- Four wave filtering methods: RC, PC-RC, GAUSS and D-P.
- Small in size, light in weight and easy to use.
- Manual or automatic shut down.
- Can memorize 7 groups of measurement results and measuring conditions for later use or download to PC.
- Metric /Imperial Conversion.
- Uses USB/RS-232 data output to connect with PC.
- Provides Bluetooth data output choice.
Technical Specifications
| Standards | GB/T6062, ISO4287, DIN4768, JIS B, ANSI46.1 | |
| Parameters | Ra, Rq, Rz, Rt | |
| Measuring Range | Ra, Rq: 0.005 µm ~ 16.00 µm/0.020 µinch ~ 629.9 µinch
Rz, Rt: 0.020µm ~ 160.0 µm /0.078 µinch ~ 6299 µinch |
|
| Accuracy | <<±10 % | |
| Fluctuation of Display Value | <<6 % | |
| Resolution | 0.001/0.01/0.1 | |
| Sensor | Radius of Probe Pin | 5 µm |
| Material of Probe Pin | Diamond | |
| Measurement Force of Probe | 4 mN (0.4 gf) | |
| Probe Angle | 90º | |
| Vertical Radius of Guiding Head | 1.88 in (48 mm) | |
| Maximum Driving Stroke | 0.7 in (17.5 mm) | |
| Cut-off length(l) | 0.0098 in (0.25 mm),
0.0031 in (0.8 mm), 0.098 in (2.5 mm) |
|
| Driving Speed | Sampling | When Length=0.0098 in (0.25mm),
Vt=0.0137 in/s (0.135 mm/s) |
| When Length=0.0031 in (0.8 mm),
Vt=0.019 in/s (0.5mm/s) |
||
| When Length=0.098 in (2.5 mm),
Vt=0.039 in/s (1 mm/s) |
||
| Returning | Vt=0.039 in/s (1 mm/s) | |
| Profile Digital Filter | RC, PC-RC, GAUSS ,D-P | |
| Evaluation Length | 1~5 L Optional | |
| Data Memorize | 7 Groups | |
| Humidity | <80 % RH | |
| Operating Temperature | 32 °F ~ 122 °F (0 °C ~ 50 °C) | |
| Power Supply | 4 x 1.5 V AAA (UM-4) Battery | |
| Dimensions | Main Unit Size: 5.86 in x 2.63 in x 1.14 in (149 mm x 67 mm x 29mm)
Measuring Base Size: 7.28 in x 2.20 in x 1.85 in (185 mm x 56 mm x 47mm) |
|
| Weight | 1.06 lbs (485 g) | |
Additional Information
- Principle
When measuring the roughness of a surface, the sensor is placed on the surface and then uniformly slides along the surface by driving the mechanism inside the tester. The sensor gets the surface roughness by the sharp built-in probe. This roughness causes displacement of the probe which results in change of inductive amount of induction coils so as to generate analogue signal, which is in proportion to the surface roughness at output end of phase-sensitive rectifier. The exclusive DSP processes and calculates and then outputs the measurement results on LCD.
- Probes
| Model and Name | Applications | Structure Diagram |
| Standard Sensor | Used for roughness tests on plane surface, shafts and in bores from 5.5 mm diameter. Maximum bore depth 22mm |  |
| Groove Stylus | Used to measure the surface roughness of deep groove, greater than 5 mm in width, less than 9.5 mm in depth; or the pedestal seat less than 9.5 mm in height. |  |
| Curvature Probe | Used to measure surface roughness of curved workpiece larger than 3 mm in curvature radius |  |
- Front Panel Descriptions and Names of Each Parts
3.1 Key descriptions

Fig. 3.1
3-1 Cut-off, 3-2 Parameter, 3-3 Calibration key, 3-4 Power, 3-5 Start, 3-6 Range, 3-7 Up/Save, 3-8 Down/Read, 3-9 Delete/Menu,
3.2 Names of each parts

Fig. 3.2
3-10 Sheath of probe, 3-11 Probe, 3-12 Adjustable leg

Fig. 3.3
3-13 Stylus, 3-14 Protection sleeve, 3-15 Socket

Fig 3.4
3-17 Connection sheath, 3-18 probe

Fig. 3.5
3-19 Filter, 3-20 Calibration, 3-21 Measurement, 3-22 Position pointer, 3-23 Browsing, 3-24 Memory, 3-25 Parameters, 3-26 Battery, 3-27 Unit, 3-28 Cut-off
3.3 Installation and unloading of sensor
To install, hold the main part of the sensor by hand, push it into connection sheath at the bottom of the instrument as shown in Figure 3-4 and then slightly push to the end of sheath. To unload, hold the main part of sensor or the root of protective sheath and slowly pull it out.
- The probe of the sensor is the main part of this instrument and requires close attention.
- During installation and unloading, the probe should not be touched in order to avoid damage which can affect measurement results.
- Connection of the sensor should be reliable during installation.

Fig. 3.6
Connection of Power
Adapter and RS232C

Fig. 3.7
3-30 Computer, 3-31 RS-232 port to PC COM, 3-32 RS-232 socket
- Measuring Procedures
4.1 Preparations for measurement
- Switch on to test if the battery voltage is normal.
- The instrument automatically restores conditions of the last measurement before it is turned off since these conditions are automatically stored. Meanwhile, the second line of 2 digits on display shows the groups stored in the memory. Before taking measurement, preparations have to be made and checked.
- To check if the cut-off length selected is right. If not, Hold the
 to select. For the recommended cut-off length, please see the table in 10.7.
 - To check if the evaluation length selected is right. If not, hold the
 key, then
  or
or  to select. To save and quit, just hold the
 key again.
 - To check if the profile filter selected is right. If not, hold
 till ‘FIL T’ is on Display. It takes about 4 seconds from starting pressing the
  . And then pressing
 key or
  key to cycle between RC, PC-RC, GAUSS, D-P or vice versa. To quit, just press any key other than
  key or
 key.
key. - To check if the measurement unit selected is right. If not, hold the
 key till ‘UNIT’ is on the Display. It takes about 8 seconds from after holding the key
  . And then pressing
 or
or to switch between the metric system and the British system. To quit, just press any key other than key or key.
 - To check if the parameter selected is right. If not, press the
 key to select. This step is very important.
 - To clear the surface of the part to be measured;
- Refer to Figure 4-1 and Figure 4-2 to place the instrument correctly, stably and reliably on the surface to be measured.
- Refer to Figure 4-2, the sliding trail of the sensor must be vertical to the direction of process line of the measured surface.
- Adjustable leg and sheath of sensor when the measured surface of the part is smaller than the measured surface of the part is smaller than the bottom surface of the instrument, the sheath of sensor and adjustable leg can be used for auxiliary support to complete measurement.

Fig. 4.1

Fig. 4.2

Fig. 4.3
4-1 Roughness tester, 4-2 Sheath of probe, 4-3 Item to be measured, 4-4 Working table, 4-5 Adjustable leg
4.2 Measuring
After preparations is done, just press Start key to measure if measuring conditions are not to be changed. Firstly, you will see the ‘–’ on the display and the probe is moving forward and sampling. Then you will see the probe stop sliding and move backward. The measurement result shows on the display after the probe stop moving.
4.2.1 Save the measurement results to the tester for later use.
After measuring, you will see the original ‘M’ becomes the ‘M’. In such a state, you can save this group of results including Ra, Rz, Rq, Rt and measurement conditions to the memory of the tester by depressing the key ![]() . Then the symbol ‘M’ changes to ‘M’ automatically while the number of memorized groups increases 1.
. Then the symbol ‘M’ changes to ‘M’ automatically while the number of memorized groups increases 1.
4.2.2 How to browse the different parameters
In ‘M’ state, you can browse different parameters. The corresponding parameter and its value show on the display once depressing the key
4.2.3 Delete the measurement results
In ‘M’ state, you can delete this group of results by depressing the key ![]() . Then the symbol ‘M’ changes to ‘M’ automatically. On the other hand, the new measurement results will replace the old ones on pressing the Start key in ’M’ state.
. Then the symbol ‘M’ changes to ‘M’ automatically. On the other hand, the new measurement results will replace the old ones on pressing the Start key in ’M’ state.
- How to browse the memorized data
No matter in ‘M’ state or ‘M’ state, you can browse the memorized data by depressing the![]() key. The browsing state is marked in ‘R’ on display. When in state, you can browse different groups by depressing the
key. The browsing state is marked in ‘R’ on display. When in state, you can browse different groups by depressing the![]() key or
key or ![]() key. The serial number of the group shows on the display. For each group, you can still browse different parameters. The corresponding parameter and its value show on the display once depressing the
key. The serial number of the group shows on the display. For each group, you can still browse different parameters. The corresponding parameter and its value show on the display once depressing the![]() key.
key.
How to calibrate the tester
6.1 To enter the calibration state, just by pressing the key ![]() , the calibration state is marked by ‘CAL’.
, the calibration state is marked by ‘CAL’.
6.2 Take a measurement based on the Standard sample plate. Contrast the measuring value with the value of standard sample plate based on the same parameter.
6.3 Depress the key ![]() or
or ![]() to adjust the reading to the standard value.
to adjust the reading to the standard value.
6.4 Just repeat 6.2 to 6.3 till the accuracy is ok.
6.5 To quit, just press any key other than START key.
6.6 The instrument has been thoroughly tested before delivery to ensure that the display value error is less than 10 %. The user is recommended not to use the Calibration function too often.
- How to restore the factory settings
7.1 When to restore
It is necessary to restore the factory settings when a new probe is installed or the tester could not measure any more.
7.2How to restore
7.2.1 Just press the![]() key and not releasing it till ‘FAC’ on the Display. It is about 16 seconds after pressing key
key and not releasing it till ‘FAC’ on the Display. It is about 16 seconds after pressing key ![]() . This state is also marked by ‘CAL’, please see the Fig. 3-5. Also there will be a jumping reading on the display after 3 seconds, press
. This state is also marked by ‘CAL’, please see the Fig. 3-5. Also there will be a jumping reading on the display after 3 seconds, press ![]() key to exit.
key to exit.
7.2.2 After the factory settings, you have to calibrate the tester again. Please refer the part 6.
- Communicate With PC
8.1 Install the optional RS232C software to the PC.
8.2 Connect the tester to the COM port of the PC with the optional RS232 cable.
8.3Run the software on the desktop and select the COM port in the system settings.
8.4Click the button of data collection, then click the button of Begin/Continue.
8.5 To download the groups stored in the Memory, just press the key ![]() .
.
- General Maintenance
- Avoid crashes, intensive vibration, heavy dust, humidity, grease stains and strong magnetic fields;
- The sensor is a precise part and should be protected carefully. It is recommended to put it back in the box after each operation;
- Protect the standard sample plate belonging to the instrument carefully to avoid calibration faults caused by scratches.
- References
10.1 Filter
- RC filter: traditional 2-stage filter with phase difference;
- PC-RC filter: RC filter with phase-correction;
- Gauss filter: DIN4777
- D-P non-filtered profile: adopt central line of least square algorithm.
10.2 Central Line
This tester adopts minimum central line of least square algorithm.
10.3 Traversing Length
I= sampling length
n= number of sampling length
Ixn= evaluation length
10.3.1 RC Filter

10.3.2 PC-RC Filter

10.3.3 GAUSS Filter

10.3.4 D-P Filter

10.4 Definition of roughness parameter
10.4.1 Ra arithmetical mean decimation of profile
Arithmetic value of mean decimation of profile within sampling length.


10.4.2 Rz ten point height of irregularities
The average of the sum of five maximum profile peaks and the average of five maximum profile valleys within the sampling length.

10.4.3 Rq root-mean-square deviation of profile
Root-mean-square of profile deviation within the sampling length, shown as the following function

10.4.4 Rt total peak-to-valley height
Rt is the sum of maximum height of the profile peak and maximum depth of the profile valley for the evaluation length.

10.5 Fault Information
Err1 no data stored for browsing.
Err2 the Ra value of the standard sample is too small to be uses for calibration.
Err3 the value is too small to continue to decrease.
10.6 Code Standard Name
ISO4287 International Standard
DIN4786 German Standard
JISB601 Japanese Industrial Standard
ANSIB46.1 American Standard
10.7 Cut-off Length Recommended
| Ra (µm) | Rz (µm) | Cut-off length (mm) |
| > 5~10 | > 20~40 | 2.5 |
| > 2.5~5 | > 10~20 | |
| > 1.25~2.5 | > 6.3~10 | 0.8 |
| > 0.63~1.25 | > 3.2~6.3 | |
| > 0.32~0.63 | > 1.6~3.2 | |
| > 0.25~0.32 | > 1.25~1.6 | 0.25 |
| > 0.20~0.25
> 0.16~0.20 |
> 1.0~1.25
> 0.8~1.0 |
|
| > 0.125~0.16
> 0.1~0.125 > 0.08~0.1 |
> 0.63~0.8
> 0.5~0.63 > 0.4~0.5 |
|
| > 0.063~0.08
> 0.05~0.063 > 0.04~0.05 |
> 0.32~0.4
> 0.25~0.32 > 0.2~0.25 |
|
| > 0.032~0.04
> 0.025~0.032 > 0.02~0.025 |
> 0.16~0.2
> 0.125~0.16 > 0.1~0.125 |
- Accessories
| Standard Accessories | Main Unit |
| Standard Sample Plate | |
| Standard Sensor | |
| Small Screwdriver | |
| Measuring Base | |
| Carrying Case | |
| Operation Manual | |
| Optional Accessories | RS-232C Cable with Software |
| Bluetooth Adapter with Software | |
| Extension Rod | |
| Groove Stylus | |
| Curvature Probe | |
| Measurement Stand |


