Description
Overview
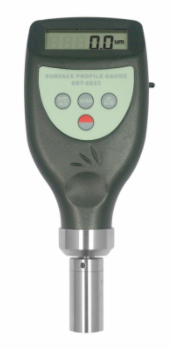
The GAOTek Surface Roughness Gauge with Metric and Imperial Conversion is a handheld gauge for fast and accurate measurement for the peak-to-valley height of the surface profile of blast cleaned surfaces. It meets the standards of ASTM D 4417-B, IMO MSC. 215(82), SANS 5772, US Navy NSI 009-32, US Navy PPI 63101-000 and is suitable for the laboratory and for use in harsh field conditions. The tungsten carbide tip will last for up to 20,000 readings and can then be easily replaced by the user in the field and cost per test is significantly lower than other test methods. The exclusive Microcomputer LSI circuit and crystal time base has been used to offer high accuracy measurements and can communicate with PC for recording, printing and analyzing by the optional software and cable for RS232C interface.
Key Features
- Compact, lightweight and easy to use
- Equipped with highly sophisticated inductance sensor
- Manual or automatic power off key
- Metric/Imperial conversion
- Average calculation function
- Measurement speed is greater than 30 readings per minute
- Meets the standards of ASTMD-4417-B, IMOMSC.215 (82), SANS5772, US Navy NSI009-32, and US Navy PPI-63101-000.
- Suitable for use in the laboratory and harsh field conditions
- Accurate, immediate and repeatable results
- The tungsten carbide tip will last for up to 20,000 readings and can then be easily replaced by the user in the field.
- Cost per test is significantly lower than other test methods
- USB data output can be used to connect with PC
- Provide Bluetooth data output choice
Technical Specifications
| Display | 4 digits, LCD |
| Range | 0 µm to 800 µm (0 mi. to 30 mi.) |
| Accuracy | ±5 % or ±5 µm (Whichever is the greater) |
| Resolution | 0.1 μm (When Measurement Value < 100 μm)
1 μm (When Measurement Value ≥ 100 μm) |
| Principle | Inductance type |
| Operating Conditions | Temperature: 32 °F to 120 °F (0 ℃ to 50 ℃)
Humidity: < 80 % RH |
| Battery Supply | 4 x 1.5 V AAA size (UM-4) battery |
| Dimensions | 6.38 in x 2.55 in x 2.10 in (162 mm × 65 mm × 28 mm) |
| Weight | 0.62 lbs (280 g) |
Additional Information
Applications of the Instrument
The instrument is widely used in fields of blast cleaned surface measurement. If the profile is too large the amount of coating required to ensure adequate coverage increases, otherwise there is a danger that the peaks remain uncoated – allowing rust spots to occur. If the surface profile is too small, there may be insufficient key to produce adequate adhesion leading to premature coating failure. Hence, this instrument ensures that the correct surface preparation optimises the performance of the coating and material usage.
Standard Accessories:
- Main Unit
- Sensor
- Standard Sample Plate
- Carrying Case
- Operation Manual
Optional Accessories:
- USB Cable with Software
- Bluetooth Adapter with Software
Front Panel Description

- 3-1 Display
- 3-2 RS232C interface
- 3-3 μm/mil conversion key
- 3-4 N/Average key
- 3-5 Power key
- 3-6 Zero key
- 3-7 Probe
- 3-8 Battery compartment
- 3-9 Indicator of Average value
- 3-10 State of average value
- 3-11 Number of measurements in the state of average value
Measuring Procedure
- Switch on the gauge by pressing the power key.
- Hold the gauge with the probe pressed firmly against the surface you are measuring such that the tip of the probe reaches into the bottom of the profile valley.
- Read the depth shown on the display. The display also shows the measurement units (μm, mil).
- The measurement unit can be easily switched by pressing the μm/mil key.
Zeroing the Gauge
- Before taking measurements, always zero your gauge on a hard flat surface
- Use the glass plate supplied with your gauge or a similar flat surface such as window glass.
- Place the foot on the glass slide provided, to ensure the tip is in the same plane as the base of the foot.
- Always press the Zero key to make the display show 0 (zero) and is immediately ready to use.
How to take Average Value
- To take the average value of repeated measurements, just depress and release the ‘N/AVE’ key to make the symbol ‘N’ show on the display, followed by a digit between 1-9 with the prefix ‘No.’.
- Here the digit is the times of measurements used to calculate the average value. Every time you depress and release the ‘N/AVE’ key, the digit will increase 1 and the digit will become ‘1’ while depressing the ‘N/AVE’ key at ‘9’.
- Adjust the digit to the number needed and depress ‘ μm/mil’ key or ‘ZERO’ key to return to the measurement state or wait for several seconds till ‘0’ appears on the display.
- Take measurements as per earlier steps.
- Every time you take a measurement, the reading and the times of measurements show on the display. When the times of measurements is equal to the number set, the gauge first displays the reading of the last and then displays the average value of last ‘ N ‘ measurements, followed by 2 beeps, with a symbol ‘AVE’ indicating on the display.
- To release from average measurement, just depress the ‘N/AVE’ till ‘N’ disappears.
Battery Replacement
- When the battery symbol appears on the display, it is time to replace the batteries.
- Slide the Battery Cover away from the tester and remove the batteries.
- Install batteries paying careful attention to polarity.


