Description
Key Features
- Low-frequency signal online
- Identifies three commonly used signal frequency, that is, 2 KHz, 1 KHz, 270 Hz
- Supports multiple fiber diameters
- LED indicator is simple and clear
- Signal direction is indicated by the left and right LED direction indicators
- Battery power is displayed in two-color LED indicator
- Produces signal mode mechanical vibration
- Battery power indicator prompts the user to replace the battery when the battery is low
- Uses “Push to talk” mode of operation, so that the operation is simple and convenient
- Recognition frequency is a beep
- Provides the appropriate adaptation head for the bare fiber, pigtail etc.
- Low power consumption, small size and portable
Technical Specifications
| Identified Wavelength Range | 800 nm – 1700 nm | |
| Identified Signal Type | CW, 270 Hz ± 5 %,1 kHz ± 5 %,2 kHz ± 5 % | |
| Detector Type | Ø1 mm InGaAs 2pcs | |
| Adapter Types | Ø0.25 (Applicable for bare Fiber)
Ø0.9 (Applicable for Ø 0.9 cable ) Ø 2.0 (Applicable for Ø 2.0 cable ) Ø 3.0 (Applicable for Ø 3.0 cable ) |
|
| Signal Direction | left & right LED | |
| Signal Direction Test Range
(dBm, CW/0.9 mm bare fiber) |
-46 dBm – 10 dBm (1310 nm) | |
| -50 dBm – 10 dBm (1550 nm) | ||
| Signal Power Test Range
(dBm, CW/0.9 mm bare fiber) |
-50 dBm – 10 dBm | |
| Signal Frequency Display (Hz) | 270 Hz,1 KHz,2 KHz | |
| Frequency Test Range
(dBm, Average Value) |
Φ 0.9,Φ2.0, Φ3.0 | -30 dBm – 0 dBm(270 Hz, 1 KHz) |
| -25 dBm – 0 dBm (2 KHz) | ||
| Φ0.25 | -25 dBm – 0 dBm (270 Hz, 1 KHz) | |
| -20 dBm – 0 dBm (2 KHz) | ||
| Insertion Loss (dB, Typical Value) | 0.8 dB (1310 nm) | |
| 2.5 dB (1550 nm) | ||
| Alkaline Battery (V) | 9 V | |
| Operating Temperature | 32 °F to 122 °F (0 C to 50 ℃) | |
| Storage Temperature | -14°F to 158°F (-10 ℃ to 70 ℃) | |
| Dimension | 7.7 in x 1.2 in x 1.06 in (209 mm x 33 mm x 31 mm) | |
| Weight | 0.44 lbs (200 g) | |
Additional Information
Applications of the Instrument
- Telecom Engineering and Maintenance
- CATV Engineering and Maintenance
- Integrated wiring system
- Room cable to find, maintenance
- Scientific Research
Device Description
This instrument uses non-interrupted interference-free clamping signal generator, to ensure low level loss. A periodic force is applied to the signal-bearing optical fiber through the instrument at the location of the transmitter and a low-frequency signal of 1 Hz is applied to the load signal. This signal is detected through sound and light, etc. to inform the user that the corresponding fiber has been found.
Functional Description
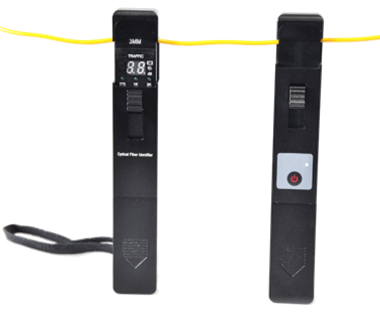
- Fixture: Clamp and hold the fiber for fiber identification
- Fixture push button: Push this push button to clamp, hold, and release the clamp
- Indicator light: Divided into fiber direction indicator, signal strength indicator, optical fiber transmission, light frequency indicator and battery power indicator
Instructions for use
- Select the adapter head
Select the adapter head according to the different naked fibers and pigtail specifications to select and install the matching adapter. This instrument is equipped with the following four types of adapter heads.
- Clamp and loosen
When you need to clamp the fiber, push the push button to the fiber clamp, and then hold down the push button on the front, obliquely pushing the button, so that the button does a small degree of rotation movement.
- Fixture clamping
When you need to release the fiber a little forward, press the push button and then hold down the rear of the push button, the fixture will spring under the action of the elastic response, release the fiber.
- Clamp release
- Power ON/OFF
- Push up the fixture button, the instrument automatically boots up
- Release the fixture button, the instrument automatically shuts down
- Fiber Identification
- Place the fiber to be tested in the clamp groove, push the button lock clamp, and bring the hood forward.
- If there is a signal in the fiber, the left and right direction lights show the signal direction, the signal strength and strength of light to show its strength.
- If there is no signal in the fiber, the signal strength lamp shows LO, and the direction indicator may flash around. When the fiber is not clamped, the directional light may also flash around.
- When the signal frequency is 2 KHz, 1 KHz, 270 Hz, the corresponding indicator light is accompanied by a buzzing (when the signal is too weak will not be correctly identified).
- When the instrument is added with the low frequency signal, it will automatically recognize the signal. Assuming the correct fiber is found, when the detected low frequency signal is detected, the digital tube scrolls through and is accompanied by a buzzer, and if the signal is too weak or the wrong fiber is present, the instrument will not detect the low frequency signal.
Battery level indication
- When the battery power indicator is green, it indicates that the battery is fully charged.
- When the battery power indicator shows yellow and green, it means that the battery is running out, the instrument can still work, but the user must replace the battery.
- When the battery power indicator is red, it means that the battery is low, then the instrument will not work, the user must replace the battery.
Replace fixture
- Slide the clamp adapter head left or right along the track to remove the existing adapter head
- Select the adapter that matches the measuring fiber
- Place the adapter head gently along the fixture rail until the positioning device is aligned
Operation of the instrument
The operation of the instrument is very simple, just need to test the fiber into the fixture slot, push up the push button, press the boot button to start. To save battery power, turn off the power when the device is not in use.
Maintenance
- When using the instrument pay attention to the fixture head and the fiber to be tested should match, the location of the fiber in the fixture should be just caught in the groove.
- Do not touch the items on both sides of the fixture.
- Keep both sides of the fixture clean and clean the probe surface regularly with a cleaning solution.
- If the instrument is not used for a long time, please take the battery out.
Configuration List
- Fiber Optic Recognizer – 1
- Fiber optic signal generator – 1
- Operating instructions – 1
- Soft package – 2 only
- Battery – 2 sections
- Adaptation head – 4
- Hood – 1


