Description
Overview
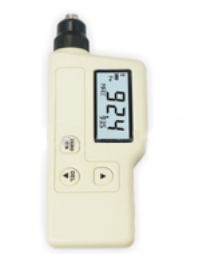
GAOTek portable Thickness Gauge for Advance Film and Coating Measure (Accuracy) is designed to measure non-magnetic coating on magnetic conductor base material with operating current 14 mA.It adopts magnetic induction technique for measurement. Low battery indication, Beep sounds indication, auto power off, data record, recall and delete function, and LCD backlight are some of its important features. This portable device is widely used on workshop, manufacturing, chemistry or quality control fields.
Key Features
- Beep sounds indication
- LCD backlight
- Low battery indication
- Measurement mode: Single, continuous and differential mode
- Simple, compact structure and portable design
- Data record, recall and delete function
- LCD display measurement value and status
- Use Hi-sensibility sensor for precise measurement
- Three different calibration methods basic, zero point and two point calibration to make it easy to process the system
- Data analysis: Average, Maximum, Minimum, standard deviation, and measure times
- Metric / Imperial unit selection
- Auto power off
Technical Specifications
| Measuring Range | 0 μm ~1800 μm |
| Resolution | 0.1 um/1 μm |
| Accuracy | ±(3% H+1) |
| Condition of Objective Material | |
| Minimum Curvature Radius | Convex: 0.07 in (2 mm), Concave: 0.43 in (11 mm) |
| Minimum Sample Diameter | 0.47 in (12 mm) |
| Minimum Substrate Thickness | 0.01 in (0.5 mm) |
| Operating Current | About 14 mA |
| LCD Backlight Function | 7 seconds |
| LCD Display | 3 1/2″ display |
| Battery Life | Continuously 20 hour |
| Power Supply | 9 V Alkaline battery |
| Auto Power Off | 1 minute |
| Low Battery Indication | 7.0 V ±0.2 V |
| Dimension | 2.63 in x 1.18 in x 6.88 in (67 mm x 30 mm x 175 mm) |
| Weight | 0.29 lbs. (133 g) (without battery) |
| Operating Humidity | 10 % ~ 95 % RH |
| Operating Temperature | 32 °F ~104 °F (0 °C ~ 40 °C) |
Additional Information

LCD Display

Operation
Substrate and Standard Piece
Standard piece:
- All the sample with a known thickness could be used as a standard calibration piece and in short referred to as standard piece.
2.The coated standard piece – An even firmly-coated standard piece with a known thickness could be used as a Standard Piece too, and in terms of the application of this product, the coating must be non-magnetic.
Substrate:
- The standard substrate’s roughness and magnetism must be close to those of the material to be measured. To identify the suitability of the substrate, compare the outputs from the standard piece with the material to be measured.
2.If the thickness of the material is in the range of the regulated, two methods could be selected to calibrate.To calibrate a metal Standard Piece that has the same thickness as the material to be measured, use a similar magnetic and electricity standard metalgasket piece which have enough thickness for calibration, be sure that there is no spacing between substrates.
3.If the curvature of the material is too big to be calibrated on the flat surface, please ensure that the coated standard pieces curvature has the same thickness as the material to be measured.
Battery installment
- Grip tightly the unit body with your left hand; hold down the battery door with your right-hand thumb to open it according to the arrow direction, as shown in the following figure:

- Insert the 9 V battery into the battery compartment, note the battery polarity, and then close the battery door, as shown in the following figure:

- Turn on the unit and check-up battery
a.Press the ZERO/ON key to turn on the unit, as shown in the following figure:
b.After the entire screen displays for 1 second, the default state is acceleration mode, if the lowbattery symbol or appears, please promptly replace the battery, as shown in the following figure:

Instrument Calibration
To ensure the precise test result, please calibrate the instrument at the test scene. The instrument has three methods to calibrate: zero point calibration, two point calibration, and basic calibration.
Zero Point calibration:
- Take a measurement on a standard substrate or on an uncoated substrate. LCD displays a data, for example, 3 μm as shown in the figure below.

2.Do not lift the sensor tip and press the ZERO/ONkey, the buzzer sound indicates Zero point calibrationis completed. LCD displayed like the following pictureat this time:

3.Repeat steps (a) and (b) to make basic measure value less than 1 m, this can improve measurement precision.
Two Point Calibration:
- Calibrate zero point first.
- Take a measurement on the standard piece whose thickness is close to the target piece (like 1000 μm), if the LCD displays 1006 μm, like the following picture:

3.Do not lift the sensor tip and press the UP and DOWN key to correct the reading, after these the calibration is completed, the instrument is ready to process.
4.LCD displayed like the following picture at this time:

5.To ensure a precise two point calibration, repeat steps b and c to improve measurement precision and reduce incidental error.
Basic Calibration:
It is necessary to change the basic calibration under the following conditions:
———-the top of the sensor is wear and tear
———-after the sensor is maintained
———-Special use
———-the product has not been used or calibrated for a long time
If the reading goes beyond the regulating range of the accuracy during the measurement, it is necessary to calibrate the sensor again, this process is termed as basic calibration. Input seven adjust value (zero and 6 thickness value) to recalibrate the detect head. The operation method of basic calibration is as follows:
- Prepare six standard pieces whose thickness is at 45~55, 95~105, 220~280, 450~550, 900~1050, 1900~1999, unit: μm.
- Press the UP key and ZERO/ON key to turn the products, LCD displays as follows:

After that, you can take zero calibration to iron basic.
- Choose a standard piece at the thickness between 45-50, when obtaining a reading, for example, 49.0, LCD displays as follows:

- Press UP and DOWN key to adjust the display value until the reading equals with the standard piece’s thickness, and then place the next standard piece on the iron basic to calibrate.
- When calibrating the standard piece at 95~105, for example, 100, LCD displays as the following picture:

- Press ‘up’ and ‘down’ key to adjust the display value until the reading equals to the standard piece’s thickness, and then place the next standard piece on the iron basic to calibrate.
- Repeat the above steps until the last standard piece is calibrated, after the product auto power off and the new calibrated value has been saved in the product’s memory. Power on the unit again, the unit will process according to the saved.
Unit Selection
- Press ZERO/ON key to turn on the unit, and then press UP / DOWN key to select the test mode when LCD display UINT.
- The default unit is μm, LCD displays as the following picture:

- Press ZERO/ON key, you can select your desired unit on μm or mil, LCD displays as the following picture:

Single Measurement
- Prepared target piece you want to test.
- Press ZERO/ON key to turn on the unit, the default test mode is single test mode, LCD displays as the following picture:

- Contact sensor with the test surface vertically and press the sensor lightly, an output appears on the LCD, for example, 138 μm, and buzzer beeps, LCD displays as below:

- Every time sensor contacts the test surface vertically, an output will be generated with a beep of the buzzer.
- For another measurement, lift the sensor, and repeat the operation above.
Continuous Measurement
- Press ZERO/ON key and then press UP / DOWN key to select the test mode, when LCD displays CTN that means into Continuous measurement mode. LCD displays as the following picture:

- Place the sensor on the target piece you want to measure, and then press the sensor lightly to measure, the buzzer will not sound during the measurement, LCD will display the measurement result continuously until the sensor is lifted, the last measure value will be saved in the test automatically, and the data is numbered as 1 (when the second measurement is finished, the reading will be numbered in sequence as 2, until the max memory is 15), LCD willdisplay as the following figure:

Standard Deviation Measurement
- Press ZERO/ON key and then press UP /DOWN key to change the test mode, when LCD displays DIF that means got into Coating standard deviation measurement mode.
LCD displays as the following picture:

- Place the sensor on the target piece you want to measure, and then press the sensor lightly to measure, the buzzer will sound, LCD will display the value of the difference between the last reading and the current reading, LCD displays as the following picture:

Data Record/Recall and Delete
Record:
The measurement result will be saved automatically after every measuring and the measurement quantity will increase one by one after every measurement until the max number 15. The unit only shows the reading without the record in memory if there are 15 records have been saved in memory.
Review Stored Data
Press UP and DOWN key to review the measurement values when the measurement number is flashing.
Delete
Delete the current data: when you want to delete one of the recorded reading, you can press the ‘down’ key to go back to the above one when the measurement number is flashing, and then take another measurement for replacing the recorded data.
Delete all the data: you can delete all the data by pressing the ZERO/ON key for 2 seconds when the measurement number is flashing.
Data Analysis
The unit also provides data analysis function after having measured several group data, press DOWN/ UP key to change mode, LCD will display average value (AVG), MAX, MIN, standard warp (dFR), data number (NO), LCD displays as the following picture:

Maintenance
- Replacement and maintenance of battery:
- After power is on, if a symbo
 lappears on the LCD, you need to replace the battery immediately.
- Remove the battery from the unit if it is not required for extended periods of time in order to avoid damage resulting from a leaking battery.
- Do not store or use the unit in the following environment:
- Splashes of water or high levels of dust.
- Air with high salt or sulphur
- Air with other gases or chemical materials.
- High temperature or humidity (above 122 °F (50°C), 90 %) or direct sunlight.
- Do not disassemble the unit or attempt internal alterations.
- Never use alcohol or diluents to clean the unit casing that will especially erode the LCD surface; just clean the unit with little damp sponge and mild soap.


