Description
Overview
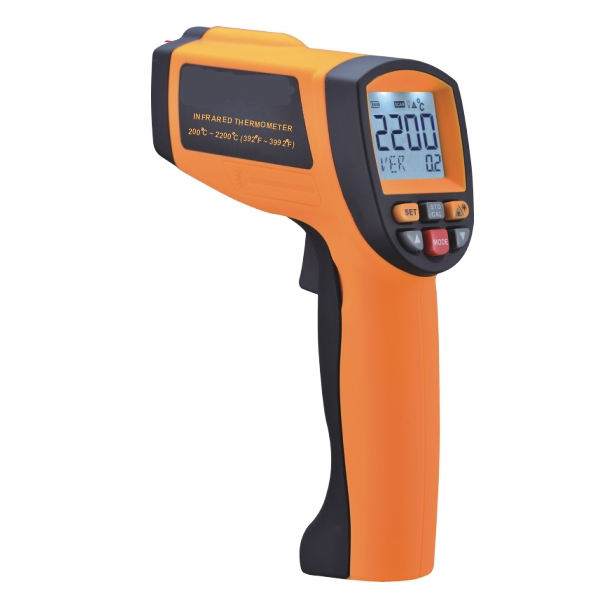
GAOTek ‘Infrared Thermometer Auto shut down (Data hold)’ is an adjustable temperature tester comes for a temperature ranging from 392 ℉ to 3992℉ (200 ℃ to 1800 ℃) is used for measuring the temperature of the object’s surface quickly and safely, which is applicable for various hot, hazardous or hard-to-reach objects without contact directly. The optics system collects the infrared energy emitted by object and focuses onto the sensor. The sensor then translates the energy into electricity signals which will be readings shown on the LCD by the signal amplifier and signal process circuit. It is equipped with RS-232 data export function.
Key Features
- MAX/MIN/AVG/DIF reading
- High/Low Temperature Alarm setup
- Works at a temperature ranging 392 ℉ to 3992℉ (200 ℃ to 1800 ℃)
- 4000 Data Store/Recall Function
- ℃/℉ Selection
- Data Hold function
- Laser Target Pointer selection
- Backlight ON/OFF selection
- RS-232 Interface & Analysis software
- Auto Power Shut Off
- Low power indication
- Positioning Laser on/off selection
- Emissivity : 0.1 to 1.00 adjustable
Technical Specifications
| Temperature Range | 392 ℉ to 3992℉ (200 ℃ to 1800 ℃) | |
| Emissivity | 0.1 to 1.00 adjustable (pre-set 0.95) | |
| Field of view | D/s=Approx 80.1 ratio (D = Distance; S = spot) (Has 90 % encircled energy at the focal point) | |
| Storage | -4 ◦F to 14 ◦F (-20 ◦C to 60 ◦C) ≤85 %, without battery | |
| Spectral Response | 900 nm to 1700 nm | |
| Power Off | Automatic shut off after 7 seconds, approximately | |
| Relative Humidity | 10 % to 80 % RH Non condensing | |
| Power Supply | 9V battery | |
| Weight | 0.595 lbs (270 g) | |
| Size | 5.55 in x 2.362 in x 8.66 in (141 mm x 60 mm x 220 mm) | |
| Temperature Range | 392 ℉ to 3992 ℉ (200 ℃ to 2200 ℃) | |
| Resolution | 0.1◦F ( 0.1 ◦C) | |
| Accuracy | 392 ℉ to 842 ℉ (200 ℃ to 450 ℃ ):
±2 ℃ or ±2 % 842 ℉ to 2012 ℉ ( 450 ℃ to 1100 ℃): ±3 ℃ or ±3 % 2012 ℉ to 3992 ℉ (1100 ℃ to 2200 ℃) : ±4 ℃ or ±3 % |
|
| Repeatability | ±1 % or ±1 ℃ | |
| *Distance Spot Ratio | 80:1 | |
| Resolution | 0.1℃/℉ | |
| Time Response | 500 ms, 95 % response | |
Additional Specifications

- Description Of Parts Buttons 2. Buttons
LCD Display

A: Temperature Reading
B: Temperature Unit
C: Laser on icon
D: Backlight on icon
E: Battery power icon
F: Scanning icon
G: Data hold icon
H: Mode/emissivity icon
I: Data store/recall icon
J: Low temperature alarm icon
K: High temperature alarm icon
Distance to spot a size
When take measurement, pay attention to the Distance to Spot Size. As the Distance (D) from the target surface increases, the spot size (S) of measuring area becomes larger. The Distance to Spot size of the unit is 80:1. This unit equipped with a laser, which is only used for aiming.
2). Field of view:
Make sure the target is larger than the unit’s spot size. The smaller the target, the smaller measuring distances. When accuracy is critical, make sure the target is at least twice as large as the spot size.

Emissivity:
Most organic materials and painted or oxidized surfaces have an emissivity of 0.95 (pre-set in the unit). Set the EMS according to different objects surfaces, please refer to the right table for emissivity of normal materials. Inaccurate readings will result from measuring shiny or polished metal surfaces. To compensate for this, adjust the emissivity or cover the surface to be measured with masking tape or flat black paint. Measure the tape or painted surface when they reach the same temperature as the material underneath.
Operation:
- Turn ON/OFF:
Install/replace battery:
Open the battery door and insert a 9V alkaline battery correctly. Then close the battery door.
b. Turn ON/OFF:
Pull the trigger until a “Bi…Bi…”sound appears. The unit turns off automatically if there is no further operation in 30 seconds.
- Locate hot/cold spot:
To find a hot/cold spot, aim the thermometer outside the area of interest, then scan across with up and down motion until you locate


3. Measurement:
a. Trigger: Pull the trigger to turn on, LCD displays VERXX software version for 1 second, and the temperature reading. SCAN and EMS (pre-set emissivity 0.95) displays at the same time. Release the trigger, the temperature will be held automatically, LCD display the temperature reading and HOLD icon.
b. Laser and backlight ON/OFF: When the backlight turns on, any operation will remain backlight for 7 seconds. LCD indicates laser / backlight ON/OFF status. Press this button again and again will change the status of laser/backlight.
c. Mode selection: Press MODE button, LCD displays in the sequence of PLY-CLR-MAX-MIN-AVG-DIF -HAL-LAL-SNG-EMS (Note: under the mode of EMS, HAL and LAL. Press the SET button first, when the mode flashes, press up /or down button to set up, finally press SET to confirm)
d. Illustration of modes:
- PLY: Replay the stored data. When PLY is selected, press up or down button to check the data.
- CLR: Clear stored data. Press STO/CAL button for 2 seconds, the stored data will be all cleared.
- MAX: Measure maximum temperature.
- MIN: Measure minimum temperature.
- Average: Measure average temperature.
- DIF: Basic on the reading before press SET button compute the difference of current reading.
HAL: High temperature alert— When selected HAL, press the up or down button to set the High temperature alarm trigger and confirmed by pressing SET button. When reading over trigger, LCD display HI icon with BiBi audio sounds.
- LAL: Low temperature alert— when selected LAL, press up or down button to set low temperature alarm trigger and confirmed by pressing SET button. When reading over trigger, LCD display LOW icon with BiBi audio sounds.
- EMS: Adjust the emissivity from 0.1 to 1.0.
4. Data storage:
a. When take measurement, every pressing on STO/CAL button will save a data, which has the max capacity up to 4000 data.
b. When take measurement, press STO/CAL button and pull the trigger continually allows you to save the sampling data continually.
5. Data review:
a. In PLY mode, press UP/DOWN button to replay the data.
b. Pressing SET button and UP/DOWN button at one time allows you to review data quickly. Or you may connect the product with PC to export the data.
- Data clearance:
In the CLR mode, pressing STO/CAL button for 2 seconds to clear the stored record.
- Lock/unlock:
In measuring, pressing on the trigger and the SET button at one time to enter into continuous measuring mode. There is lock icon on the LCD during this operation; press the trigger again to exit continuous measuring mode, there is unlock icon on the LCD during this operation.
- Unit selection:
Open the batter door and slide the switch to change the temperature unit.
- RS-232 connection with PC:
a. When the product is properly connected with PC, there is DATA displaying on the LCD.
b. Please refer to the file IRT instructions in the disk included to install the program
c. Program function: to retrieve data, to save online/offline and data curve analysis
- DC IN: Use the 9V 500 mA DC adaptor to save battery consumption.
Safety and Maintenance:


