Description
Overview
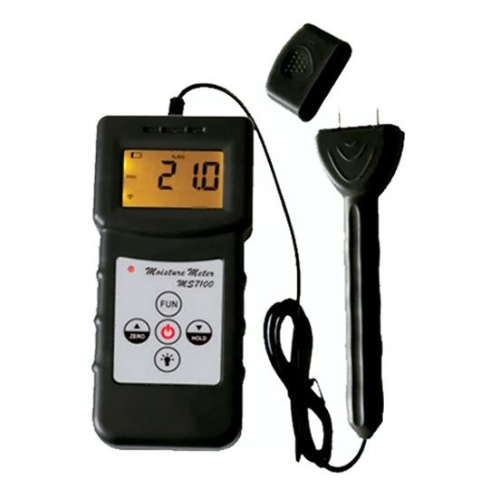
The GAOTek Moisture Analyzer for Wood Timber (Fast/High Precision) is a professional wood moisture meter that can test more than 100 wood species. This moisture analyzer helps to save time and expense by monitoring dryness and helps to prevent deterioration & decay caused by moisture whilst in storage, therefore processing will be more convenient and efficient. The moisture meter operates by electrical resistance and has automatic temperature compensation. It is applicable of woodwork, paper making, flake board, furniture, timber traders and other relevant industries.
Key Features
- Portable, compact and easy to use
- Instant moisture measurement readings for more than 100 wood species
- Digital display with back light gives exact and clear readings.
- Operates by electrical resistance and has automatic temperature compensation.
- Measurements can be taken by inserting the sensors into the bale of grains.
- Manual Power off at any time and Auto-Power off after 5 minutes from last operation.
- Data hold function and low battery alert.
Technical Specifications
| Display | 4 digital LCD |
| Measuring range | 0-80 % |
| Temperature | 32 °F ~ 140 °F (0 °C – 60 °C) |
| Humidity | 5 % – 90 % RH |
| Resolutions | 0.1 |
| Accuracy | ± 0.5 % n |
| Operation | Electrical resistance method, automatic temperature compensation |
| Power supply | 4 x 1.5 AAA size (UM-4) battery |
| Dimensions | Main Unit: 5.51 in × 2.36 in × 0.86 in (140 mm×60 mm×22 mm) |
| Sensor | 2.83 in × 1.57 in × 0.78 in (72 mm × 40 mm × 20 mm) |
| Weight | 0.38 lbs (175g not including batteries) |
- OPERATION PROCEDURE
1.1 Turn on the power key, the symbol “0” shows up on display. The value must be set to “0”. If the display shows any other value except “0”, press the “0” key. Make sure the probe doesn’t touch anything, else it won’t be efficient. Setting to “0” can decrease the effect of the temperature and humidity in the air.
1.2 Take off the cover of the sensor and insert the probes straight into the materials. The deeper the probes, the more accurate the value.
1.3 The symbol “Max” shows on display on releasing the “Hold” key. The max value is stored on display when measuring the process. This function will be cancelled by releasing the “Hold” key again.
1.4 Code choice. Press the “FUN” key and hold it until “CD00” is showed on display,
Press “▲” and “▼” key to choose the code you need, and then release the “FUN” key to confirm it.
1.5 Replace batteries. When the battery symbol shows up on the display, it is time to replace the batteries. Slide the battery’s cover and insert the batteries properly.
- WARNING SETTING
2.1 Press the key 3-9 and hold it until “AL2” shows on display (it takes 5 seconds to complete the operation). Then press “▲ “ and “▼”” key to choose the value you need. Press “FUN” key again to go back to the operation state.
2.2 Setting the “AL1” is the same as “AL2”.
2.3 Usually, “AL2”must be larger than “AL1”, but if the “AL2” is less than “AL1” during the setting process, then the instrument will be set back to the factory setting. Ex. AL1=13, AL2=18.
- Replacing batteries.
When the battery symbol shows up on the display, it is time to replace the batteries. Slide the battery’s cover and insert the batteries properly.
Notes:
Please take the batteries out if the instruments aren’t in use for a long time. The probes shouldn’t touch anything while setting the value to “0” or it won’t be efficient


