Description
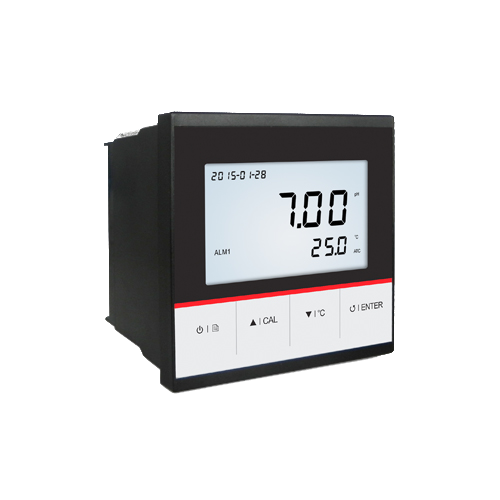
GAOTek PH Controller with 3 Points Calibration (Reset Function) is designed for monitoring the pH of liquids in chemical, pharmaceutical, environmental protection and food industries.The controller is equipped with a standard pH electrode. The controller has a key 1 to 3 points push-button calibration with auto-buffer recognition. The controller has a Selectable NIST or USA pH buffer group. The Automatic electrode slope display helps user decide whether to replace sensor.
Key Features
- Economical industrial online pH controller is equipped with a standard pH electrode.
- 1 to 3 points push-button calibration with auto-buffer recognition.
- Selectable NIST or USA pH buffer standard.
- Automatic electrode slope display helps user decide whether to replace sensor.
- Automatic Temperature Compensation provides accurate reading over the entire pH range.
- Low and high alarm limits can be set by user and automatically activate an external device.
- 4 to 20mA output signal meets industry standard.
- Manual temperature calibration improves the measurement accuracy of meter.
- Selectable temperature unit (°C or °F) for different application requirements.
- System menu allows setting the 9 parameters, including the pH buffer standard, number of
calibration points, alarm limits, hysteresis value, etc. - Reset feature automatically resumes all settings back to factory default settings.
Technical Specifications
| pH | |
| Range | -1.00 pH~ 15.00 pH |
| Accuracy | ± 0.01 % pH |
| Resolution | 0.01 pH |
| Calibration Points | 1 to 3 points |
| Calibration Solutions | USA (pH4.01/7.00/10.01) or NIST (pH4.01/6.86/9.18) |
| Temperature Compensation | 32 °F ~ 212 °F (0 °C~ 100 °C) |
| Compensation Mode | Automatic |
| mV | |
| Range | – 1000 mV ~ 1000 mV |
| Accuracy | ± 1 mV |
| Resolution | 1 mV |
| Temperature | |
| Range | 32 °F ~ 212 °F (0 °C~ 100 °C) |
| Accuracy | ± 33.8 °F (± 1 ° C) |
| Resolution | 32.18 °F (0.1 °C) |
| Communication | |
| Signal Output | 4 mA~ 20 mA |
| Load | Max 500 Ω |
| Low and High alarm limits | 1.00 ~ 10.00 pH ,Selectable |
| Communication Interface | RS485 |
| Connection Terminals | Detachable screw terminals |
| Others | |
| Environmental Conditions | 32 °F ~ 140 °F(0 °C ~ 60 °C) |
| Power Requirements | DC 24 V |
| Dimensions | 3.79 (L) x 3.79 (W) x 2.95 (H) in ( 96 (L)x 96 (W)x 75(H) mm) |
| Weight | 0.77 lbs (350 g ) |
Additional Information
How it Works:
Installation:
- Cut out a square hole approximately 3.58 (W)x 3.58 (H) in (91(W) × 91(H) mm )in the mounting panel.
- Remove the mounting bracket from controller, place the meter into the square hole.
- Replace the mounting bracket and push the meter forward until it is fully seated on the mounting plate.

Display
GAOTek PH Controller with 3 Points Calibration (Reset Function) is equipped with a clear and bright LCD display that used to show measured values and mode indicators. The following table describes the meaning of each indicator.

INDEX:
| INDICATOR | DESCRIPTION |
| Calibration | Indicates meter is in the calibration mode. |
| Setup | Indicates meter is in SETUP mode |
| ATC | Indicates meter is in the temperature compensation mode |
| ALM1 | Indicates measurement exceeded the specified high limit |
| ALM2 | Indicates measurement exceeded the specified low limit |
Keypad
The controller has four multifunction keys, names and symbols describe each function key controls.
| KEY | FUNCTION |
|
|
● Power the meter ON/OFF.
● Press and hold the key to enter the setup menu. ● Press the key to exit the calibration or setting mode |
| ▲|CAL | ●Press the key to enter the calibration mode.
●Press the key to increase setting value. |
| ▼|°C | ● Press the key to enter the temperature calibration mode.
● Press the key to decrease setting value. |
| ● Toggles between pH and mV measurement modes
● Confirms the calibration, setting value or displayed option. |
Connecting the Cables
- Before proceeding, ensure the power supply cables are disconnected from the power source.
- The following list describes the definition of the each screw terminal on rear of the controller.

INDEX:
| NO. | TERMINAL | DESCRIPTION |
| 1 | pH ( – ) | pH/mV input (Reference) |
| 2 | pH (+) | pH/mV input (Measure) |
| 3 | — | No connection |
| 4 | — | No connection |
| 5 | TC ( – ) | Temperature input (Negative) |
| 6 | TC (+) | Temperature input (Positive) |
| 7 | 485(B) | RS485 signal output (B) |
| 8 | 485(A) | RS485 signal output (A) |
| 9 | DC24 (+) | DC24 (+), linear power supply |
| 10 | 4~20mA | 4~20mA analog output |
| 11 | GND | Earth ground |
| 12 | DC(24+) | DC24V (+), linear power supply |
| 13 | DC24 ( – ) | DC24V ( – ), linear power supply |
| 14 | NC2 | Relay resting position (NC2) |
| 15 | NO2 | Relay working position (NO2) |
| 16 | COM2 | Relay Common (COM2) |
| 17 | NC1 | Relay resting position (NC1) |
| 18 | NO1 | Relay working position (NO1) |
| 19 | COM1 | Relay Common (COM1) |
| 20 | — | No connection |
Setup Menu
GAOTek PH Controller with 3 Points Calibration (Reset Function) contains an integrated setup menu that allows you to customize each displayed option to meet measurement requirements.
| PARAMETER | DESCRIPTION | OPTIONS | DESCRIPTION | DEFAULT |
| bUF | pH Buffer | USA | USA Standard (pH4.01, 7.00, 10.01) | |
| nISt | NIST Standard (pH4.01, 6.86, 9.18) | |||
| CAL | Calibration Point | 1 | 1 point | |
| 2 | 2 points | |||
| 3 | 3 points | |||
| Unit | Temperature Unit | ° C | Degrees Celsius | |
| ° F | Degrees Fahrenheit | |||
| dATE | Date and Time | — | — | |
| AL-L | Low Alarm Limit | 4.00 | Setting Range 1.00 ~ 10.00 pH | 4.00 pH |
| AL-H | High Alarm Limit | 10.00 | Setting Range 10.00 ~ 1.00 pH | 10.00 pH |
| HYS | Hysteresis Value | 00.1 | Setting Range 0.01 ~ 1.00 pH | 0.01 pH |
| A0-L | Analog output (Low) | 4.00 | Setting Range 1.00 ~ 10.00 pH | 4.00 pH |
| A0-H | Analog output (High) | 10.00 | Setting Range: 10.00~1.00pH | 10.00pH |
| rSt | Reset | YES | Restores the parameters back to default settings | |
| NO | Disable |
ADDITIONAL INFORMATION:
- Select a High/Low limit setting value will activate the controller when the pH value goes above or below the setting value. Note, both setting values cannot input the same value.
- Hysteresis prevents rapid contact switching if the measuring value is fluctuating near the set point. Example: You have set the high alarm point at pH 10.00 and hysteresis value at pH 0.1. If the measuring value overshoots the 10.1 pH, the controller will activate an external device. When the measuring value drops to 9.9 pH, the external device will switch off.
- The meter has RS485 communication function, the default is 0.00~14.00 pH (-1000 mV~+1000 mV) corresponds to 4.00~20.00 mA.
- Reset function will restore the meter back to factory default parameters, all calibration values and selected parameters will be reset.
HOW TO SET THE DEFAULT PARAMETERS:
- Press and hold the key for 3 seconds to enter the setup menu, the display shows selectable parameter and page number.
- Press t or u key to scroll through menu, select the parameter you want to set (Refer to Setup Menu section).
- Press ENTER key to confirm, the display shows an option in the submenu.
- Press ◄ or ► key to set the value or select an option.
- Press ENTER key to confirm, the meter returns to measurement mode. Setting is completed.
EXIT THE SETUP MENU:
During the setup process, press ![]() key, the meter will return to measurement mode immediately.
key, the meter will return to measurement mode immediately.
Temperature Compensation and Calibration
GAOTek PH Controller with 3 Points Calibration (Reset Function) comes with an industrial pH electrode with the built-in temperature sensor. When the wires of the sensor are connected to meter, the display will immediately show “ATC” indicator. The meter is now switched to automatic temperature compensation mode.

TEMPERATURE CALIBRATION:
During the measurement, if the temperature reading displayed differs from that of an accurate thermometer, you need to calibrate the meter.
- Press oC key to enter the temperature calibration mode, the display shows current temperature reading.
- Press ◄ or ► key to set the temperature value.
- Press ENTER key to confirm. Calibration is completed.
Preparing the pH Buffer Solutions
The meter is packaged with three pH buffer packets required for calibration.
- Open the pH 7.00 buffer packet; place the powder into a 250 ml volumetric flask. Pour distilled water 250 ml to scale line, mix the solution until reagent is completely dissolved.
- Preparation of pH 4.01 and 10.01 standard buffer solutions is the same as above.
- Prepared standard buffer solutions should be stored in hermetically sealed glass containers
pH Calibration
GAOTek PH Controller with 3 Points Calibration (Reset Function) allows up to 3 points calibration in the pH mode. We recommend that you perform at least 2 points calibration for high accuracy measurement. The meter will automatically recognize and calibrate to following standard buffer values.
- USA Standard Buffer Options: pH4.01, 7.00, 10.01
- NIST Standard Buffer Options: pH4.01, 6.86, 9.18
Single point calibration should only be carried out with pH 7.00 or 6.86; otherwise calibration will not be accepted.
The meter must be calibrated prior to first use or new electrode replaced. To ensure accuracy, regular calibration is recommended. DO NOT reuse calibration solution after calibration; contaminants in solution will affect the calibration and eventually the accuracy of the measurement.
SINGLE POINT CALIBRATION:
- Make sure that you have selected 1 point calibration in the setup menu.
- Rinse the pH electrode with distilled water.
- Press CAL key, the meter shows “CAL1/pH7.00” (or “CAL1/pH6.86”).
- Dip the pH electrode into the pH 7.00 (or pH 6.86) standard buffer solution. Stir the electrode gently.
- Press ENTER key to confirm. Wait for the measured value to stabilize, the display shows “END”. Single point calibration is completed.
2 POINTS CALIBRATION:
- Make sure that you have selected 2 points calibration in the setup menu.
- Repeat steps 2 to 5 above. When the first calibration point is done, the display shows “CAL2”. The meter prompts you to continue with second point calibration.
- Rinse the pH electrode with distilled water. Dip the electrode into the pH4.01 or 10.01 (pH4.01 or 9.18) standard buffer solution. Stir the electrode gently.
- Press ENTER key to confirm. Wait for the measured value to stabilize, the display shows electrode slope and “END”. Second point calibration is completed.
3 POINTS CALIBRATION:
- Make sure that you have selected 3 points calibration in the setup menu.
- Repeat the steps 2 to 5 from single point calibration. When the first calibration point is done, the display shows “CAL2/pH4.01”. The meter prompts you to continue with second point calibration.
- Rinse the pH electrode with distilled water. Dip the electrode into the pH4.01 standard buffer solution. Stir the electrode gently.
- Press ENTER key to confirm. Wait for the measured value to stabilize, the display shows electrode slope and “CAL3/pH10.01” (or “CAL3/pH9.18”).
- Rinse the pH electrode with distilled water. Dip the electrode into the pH10.01 (or pH9.18) standard buffer solution. Stir the electrode gently.
- Press ENTER key to confirm. Wait for the measured value to stabilize, the display shows electrode slope and “END”. The meter automatically returns to measurement mode. Calibration is completed.
Note: During the calibration process, if the meter shows “Err”, please check sensor and calibration solutions are fresh and uncontaminated.
EXIT THE CALIBRATION:
During the calibration process, press key, the meter will return to measurement mode.
pH Measurement
- Rinse the pH electrode with distilled water before use to remove any impurities adhering to the probe body.
- Dip the electrode into the sample solution.
- Wait for the measured value to stabilize, record the reading on the display.
mV Measurement
- Press key until the display shows measurement unit “mV”, the meter is now switch to mV measurement mode.
- Rinse the electrode thoroughly with distilled water.
- Dip the electrode into the sample solution.
- Wait for the measured value to stabilize, record the reading on the display.
Electrode Care and Maintenance
Since pH electrode is susceptible to dirt and contamination, clean as necessary depending on the extent and condition of use.
AFTER MEASURING:
Rinse the pH electrode in distilled water; store the sensor into the electrode storage solution.
CLEANING THE ELECTRODE:
- Salt deposits: Soak the pH electrode in warm tap water to dissolve deposits, then thoroughly rinse with distilled water.
- Oil or Grease film: Wash the electrode bulb gently in some detergents and water. If necessary, using the alcohol to clean the electrode bulb, then rinse with distilled water. Place the sensor in the electrode storage solution for 30 minutes.
- Clogged reference junction: Heat a diluted KCl solution to 70o Place the sensing part of the sensor into the heated solution for about 10 minutes. Allow the sensor to cool in some unheated KCl solution.
- Protein deposits: Prepare a 1% pepsin solution in 0.1M of HCL. Place the electrode in the solution for 10 minutes. Rinse the sensor with distilled water.
REACTIVATING THE ELECTRODE:
If stored and cleaned properly, the electrode should be ready for immediate use. However, a dehydrated bulb may cause sluggish response. To rehydrate the bulb, immerse the electrode in a pH4.01 buffer solution for 10 to 30 minutes. If this fails, the electrode requires activation.
- Soak the pH electrode in 0.1M HCl for 5 minutes
- .Remove and rinse with distilled water, then place in 0.1M NaOH for 5 minutes.
- Remove and rinse again, and soak in electrode storage solution for 30 minutes.
HOW TO PREPARE THE ELECTRODE STORAGE SOLUTION:
Dissolve 22.365 grams of potassium chloride reagent (KCL) in the 100mL distilled water. Stir the solution until the solution has thoroughly mixed.


