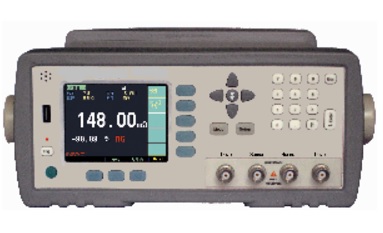
Description
Key Features
- Measuring range from 0.001 mΩ ~ 20.100 MΩ
- Fully-automatic real-time testing with 0.05 % accuracy
- Measurement Speed: 80 times/s, 15 times/s , 2 times/s
- Trigger Mode: Internal, manual, external and remote trigger
- Basic Accuracy
- Comparator Function (Sorting): Stores up to 30 groups
- High brightness, clear VFD Display
- Correction Function
- Maximum sampling rate is 7 ms
- RS-232 interface
- Zero setting function
- Beep feature
- Four terminal resistance test
- High current test mode (Open voltage <20 mV)
- HI/IN/LOW/GD/NG sorting
- With built-in temperature compensation interface to reduce the tolerance
- Data hold function
- Keypad lock function
- SCPI compatible command sets
- GPIB Interface (optional)
Technical Specifications
| Parameter | DC Resistance | ||
| Interface | RS-232 interface, Handler interface, Temperature compensation interface | ||
| Measurement Range | 0.001 mΩ ~ 20.100 MΩ | ||
| Measurement Speed | Range Hold Mode: | ||
| Ultra (Display off) | 140 readers/second (7 ms) | ||
| Ultra | 67 readers/second (15 ms) | ||
| Fast | 35 readers/second (83 ms) | ||
| Medium | 12 readers/second (83 ms) | ||
| Slow | 2 readers/second | ||
| Display Mode | 3.5” (89 mm) True color TFT-LCD | ||
| Programming Language | SCPI | ||
| Range | 10 ranges, Auto, Hold and Nominal range | ||
| Nominal Ranges | Automatic Selection | ||
| Display Digits | 5 | ||
| Correction Function | SHORT-CIRCUIT Clear Zero | ||
| Comparator | 10 bins GD
3 bins HI/IN/LO |
||
| Beep Feature | OFF/GD/NG | ||
| Trigger Mode | Internal, Manual, External and Bus Trigger | ||
| Accuracy | Slow speed | 0.05 % | |
| Medium speed | 0.1 % | ||
| Fast and Ultra speed | 0.5 % | ||
| Power Supply | 110 V /220 V AC | ||
| Frequency | 48.5 Hz ~ 62.5 Hz | ||
| Maximum Power | 20 VA | ||
| Fuse | 1 A Slow-Blow | ||
| Accurate Temperature | 73.4 ˚F ± 41 ˚F (23 ˚C ± 5 ˚C) | ||
| Accurate Humidity | ≤ 65 % RH | ||
| Warm Up Time | >30 minutes | ||
| Weight | 7.72 lbs. (3.5 kg) net | ||
| Dimensions | Outside dimension | 10.39 in x 4.21 in x 13.78 in (264 mm x 107 mm x 350 mm) | |
| Inside dimension | 8.50 in x 3.46 in x 12.72 in (216 mm x 88 mm x 323 mm) | ||
| Working Temperature | 59 ˚F to 95 ˚F (15 ˚C to 35 ˚C) | ||
| Working Humidity | ≤ 80 % RH | ||
| Storage Temperature | 50 ˚F to 104 ˚F (10 ˚C to 40 ˚C) | ||
| Storage Humidity | 10 % ~ 90 % RH | ||
Applications
- Suitable for all kinds of high, middle and low resistor
- Contact resistance of the switches
- Contact resistance of all kinds of connector
- Resistance of motor and transformer
- Windings
- Enamel-insulated wire resistance
- Relay/switch connector contacts
- PCB patterns
- Chip inductor DC resistance
- Wire Resistance
- Car, ship and plane fasten or secure resistance
Front panel

Front panel Description:
| No. | Description |
| 1 | USB Disk Port (USB-Host) |
| 2 | Trigger Key |
| 3 | Power Switch |
| 4 | System Key (Include File, System and Key Lock) |
| 5 | Soft Key |
| 6 | Menu key |
| 7 | UNKNOWN Terminal |
| 8 | Entry Key |
| 9 | Cursor Key |
| 10 | LCD Display |
Real Panel:

Real Panel Description:
| No. | Description |
| 1 | RS-232C Interface |
| 2 | Handler Interface |
| 3 | Temperature Compensation Interface |
| 4 | AC Power Cord Receptacle |
Power On/Off
Line Power Connection
Power ON

Power OFF

Warm‐up Time:
As soon as the power-up sequence has completed the instrument is ready to use. However, to achieve the accurate rating, warm up the instrument for 30 minutes.
Connect to Device under Test (DUT)
- Red logo testing BNC cables into the H in the first rotation.
- Black logo testing BNC cables into the L in the first rotation.
- Red cable to test the high-pot.
- Black cable to test the low-pot.
Fig shows Connect to DUT

Main Functions:
Correction Function
SHORT correction:
Eliminates measurement errors due to stray parasitic impedance in the test fixtures.
Comparator Function (Sorting)
Bin sort:
The primary parameter can be sorted into BIN1-BIN9, and HI/IN/LO.
The sequential mode or tolerance mode can be selected as the sorting mode.
Limit Setup:
Absolute value, deviation value, and % deviation value can be used for setup.
Measurement Assistance Functions
Key Lock
The front panel keys can be locked.
RS‐232
Complies with SCPI.
Accuracy

<MEAS DISPLAY> Page
When press the [Meas] key, the <MEAS DISPLAY> page appears.
The following measurement controls can be set.
- TRIG – Trigger Mode
- COMP – Turn the comparator ON/OFF
- RANGE – Measurement Range
- SPEED – Measurement Speed

Trigger Mode [TRIG]
SCPI Command: TRIGger: SOURce {INT, MAN, EXT, BUS}
This instrument supports four trigger modes: INT (internal), EXT (external), MAN (manual) and BUS (RS-232).
| Trigger Mode | Description |
| INT | Repeats the measurement cycle continuously |
| MAN | Performs one cycle of measurement each time pressing the [Trig] key |
| BUS | Performs one cycle of measurement each time it receives a trigger command sent via RS-232. |
| EXT | Performs one cycle of measurement each time a rising pulse is input to the handler external trigger input pin on the rear panel. |
| LEVEL | Repeats the measurement cycle continuously while the trigger signal is LOW level |
Procedure for choosing trigger mode [TRIG]
Step 1. Press the [Meas] key
Step 2. Use the cursor key to select [TRIG] field
Step 3. Use the soft keys to select desired trigger mode.
| Soft key | Function |
| INT | Internal Trigger Mode |
| MAN | Manual Trigger Mode |
| BUS | BUS Trigger Mode |
| EXT | External Trigger Mode |
Range [RANGE]
| Mode | Function Overview | Advantage | Disadvantage |
| Auto range | Sets the optimum range automatic. | Automatic selection of range | The measurement time is longer due to the ranging time |
| Hold range | Measurement is performed with a fixed range | No ranging time is required | Select a proper range depending on the value of the DUT. |
| Nominal Range | sets the optimum range depending on the nominal value | Automatic selection of range. No ranging time is required
|
Effective Measurement Range
| Range No. | Range | Measurement Range | Up | Down |
| 0 | 10 mΩ | 0.0000mΩ~30.000mΩ | ↓
30mΩ ↓ 300mΩ ↓ 3Ω ↓ 30Ω ↓ 300Ω ↓ 3kΩ ↓ 30kΩ ↓ 300kΩ ↓ 3mΩ ↓ |
↑
29mΩ ↑ 290mΩ ↑ 2.9Ω ↑ 29Ω ↑ 290Ω ↑ 2.9kΩ ↑ 29kΩ ↑ 290kΩ ↑ 2.9mΩ ↑
|
| 1 | 100 mΩ | 29.000mΩ~300.00mΩ | ||
| 2 | 1 Ω | 290.00mΩ~3.0000Ω | ||
| 3 | 10 Ω | 2.9000Ω~30.000Ω | ||
| 4 | 100 Ω | 29.000Ω~300.00Ω | ||
| 5 | 1 kΩ | 290.00Ω~3.0000kΩ | ||
| 6 | 10 kΩ | 2.9000kΩ~30.000kΩ | ||
| 7 | 100 kΩ | 29.000kΩ~300.00kΩ | ||
| 8 | 1 mΩ | 290.00kΩ~3.0000MΩ | ||
| 9 | 10 mΩ | 2.9000MΩ~20.000MΩ |
Procedure for setting the range [RANGE]
Step 1. Press the [Meas] key
Step 2. Use the cursor key to select [RANGE] field
Step 3. Use the soft keys to select the range mode or range.
| Soft key | Function |
| AUTO RANGE | |
| HOLD RANGE | |
| NOMINAL RANGE | |
| INCR+ | Increments the range in the HOLD mode |
| DECR_ | Decrements the range in the HOLD mode |
Comparator Bins [COMP]
This Micro ohmmeter has built-in comparator can sort devices into a maximum of 10 bins (BIN1 to BIN9 and NG) using a maximum of 10 pairs limits
Comparator Workflow

Procedure for setting the comparator function [COMP]
Step 1. Press the [Meas] key
Step 2. Use the cursor key to select [COMP] field
Step 3. Use the soft keys to turn on/off the comparator
When in ULTRA (DISP OFF) mode, “DISPLAY OFF” will appear on the screen.

Short‐circuit Clear Zero
SCPI Command: CORRect: SHORt
The short correction of this micro ohmmeter compensates for any residual resistance that may exist within the interval from the calibration plane, which is determined by the selected cable length, to the DUT connecting points as shown in the figure.

To perform short correction
Step 1. Press the [Setup] key
Step 2. Press the [Clear Zero] soft key.
Step 3.Press the [MEAS SHORT] soft key, a dialog message display “Short-circuit the test terminals”. The test clips short-circuit should be placed in the following way:

Step: 5: Press the [OK] soft key.
- The micro ohmmeter measures the short resistance for all ranges.
- During the measurement, “SHORT measurement in progress” dialog message is shown on the display.
- When the measurement has finished, a message “Correction finished” is displayed.
<SYSTEM CONFIG> Page
When press the [Meas] or [Setup] key followed by [SYSTEM] bottom soft key, the <SYSTEM CONFIG> page appears.
Following information can be configured in the <SYSTEM CONFIG> page.
- System date and time configuration [DATE/TIME]
- Account settings [ACCOUNT]
- Beep setting [BEEP]
- RS-232 Baud rate setting [BAUD]
- RS-232 Shake Hand [SHAKE HAND]
- RS-232 Result Send Mode [RESULT SEND]
<SYSTEM CONFIG> Page

Handler Interface
This section provides information of micro ohmmeter built-in handler interface. Include:
- Pin Assignment
- Circuit Diagram
- Timing Chart
Built-in handler interface outputs signals that indicate the end of a measurement cycle, the result of bin sorting by the comparator. In addition, the instrument accepts input of external trigger. To view the signals easily integrate this instrument with a component handler or system controller. This means it can be fully automated the tasks component inspection, component sorting, and processing of quality management data for higher manufacturing efficiency
Pin Assignment

Description of Handler Interface Signals:
| Pin | Signal | Direction | Overview |
| 1 | /BIN8 | Output | 0:GD |
| 2 | /BIN9 | Output | 0:GD |
| 3 | /BIN10 | Output | 0:GD |
| 4 | /HI | Output | 0:HI |
| 5 | IN | Output | 0:NG |
| 6 | /LO | Output | 0:LO |
| 7 | /EOC | Output | “End of measurement cycle” signal. When it signals the output, the measurement data and sorting results are available. |
| 18 | Trigger | Output | Rising-Edge, 5 V~24 V |
| 19 | /BIN7 | Output | 0:GD |
| 20 | /BIN6 | Output | 0:GD |
| 21 | /BIN5 | Output | 0:GD |
| 22 | /BIN4 | Output | 0:GD |
| 23 | /BIN3 | Output | 0:GD |
| 24 | /BIN2 | Output | 0:GD |
| 25 | /BIN1 | Output | 0:GD |
| 27-28 | Internal GND | Power | Internal GND
Common signal of internal VCC. |
| 29-30 | External GND | Power | External GND
Common signal for external DC current External VCC |
| 33-34 | Internal VCC | Power | Internal VCC (5VDC) |
| 35-36 | External VCC | Power | External VCC (3.3V~35V)
Supplies voltage for DC isolation input signal |
Power Rating:
| Input/output device | Logic | Electrical requirements | |
| OUTPUT | Connector out with pull-up resistance | Negative logic | 35 V DC
50 mA DC max |
| INPUT | Rising-edge | 50 mA DC max | |
| EXT.DCV | DC voltage input | 35 V DC max | |
| INT.DCV | Built-in VCC | 5 V DC,1A max |
Electrical Characteristics
Input Signal:
Each input signal is connected to the LED (cathode side) of the photo-coupler. The LED (anode side) is connected to the pull-up power supply voltage.
Output Signal:
Each signal is output via a pull-up 5 kΩ (0.1 W) resistor by using a photo-coupler.
Power supply:
The power supply output signal pull-up, the operation output signal pull-up and input signal drive can be set separately. External power supply can be selected from +3.3V to +35V. An internal VCC (5V DC) has been supplied for testing purpose. To use the internal power, connect PIN-34 and PIN-35 together and PIN-28 and PIN-29 together.
Typical Circuit Diagram of Handler Interface Input signals.

Typical Circuit Diagram of Handler Interface output signals.

Remote Control
This section provides the following information to remotely control the micro ohmmeter via the RS-232C or USB interface.
- About RS-232C
- About USB Interface
- Select Baud Rate.
- About SCPI
This instrument can use the RS-232 interface or USB interface to communicate with the computer to complete all the instrument functions.
About RS‐232C
Connect the controller (i.e. PC and PLC) to the RS-232 interface using RS-232 DB-9 cable. The serial port uses the transmit (TXD), receive (RXD) and signal ground (GND) lines of the RS-232 standard. It does not use the hardware handshaking lines CTS and RTS.
The RS-232 interface transfers data using: 8 data bits, 1 stop bit, and no parity.
NOTE: Cable length should not exceed 2m.
RS-232 in the real panel


About USB‐Serial Interface (Option)
The USB-Serial Interface allows you to connect this micro ohmmeter to a USB port on your PC.

To Select Baud Rate:
Before controlling the micro ohmmeter by issuing RS-232 commands from built-in RS-232 controller connected via DB-9 connector, configure the RS-232 baud rate.
This instrument’s built-in RS-232 interface uses the SCPI language.
RS-232 configuration is as follows:
- Data bits: 8-bit
- Stop bits: 1-bit
- Parity: none
To set up the baud rate
Step 1. Press the [Meas] or [Setup] key
Step 2. Press the [SYSTEM] bottom soft key.
Step 3. Use the cursor key to select [BAUD] field
Step 4. Use the soft keys to select baud rate.
Dimensions

How to remove the handle


